Docker教程

Docker简介

基于菜鸟教程自己亲自实践一遍,把教程中有误的步骤改正过来,方便自己后期查看使用

Docker 介绍

  1. Docker 是一个开源的应用容器引擎,基于 Go 语言 并遵从Apache2.0协议开源。
  2. Docker 可以让开发者打包他们的应用以及依赖包到一个轻量级、可移植的容器中,然后发布到任何流行的 Linux 机器上,也可以实现虚拟化。
  3. 容器是完全使用沙箱机制,相互之间不会有任何接口(类似 iPhone 的 app),更重要的是容器性能开销极低。
  4. Docker 从 17.03 版本之后分为 CE(Community Edition: 社区版) 和 EE(Enterprise Edition: 企业版),我们用社区版就可以了。

Docker 的应用场景

  • Web 应用的自动化打包和发布。
  • 自动化测试和持续集成、发布。
  • 在服务型环境中部署和调整数据库或其他的后台应用。
  • 从头编译或者扩展现有的 OpenShift 或 Cloud Foundry 平台来搭建自己的 PaaS 环境。

Docker 的优点

  1. 简化程序
    Docker 让开发者可以打包他们的应用以及依赖包到一个可移植的容器中,然后发布到任何流行的 Linux 机器上,便可以实现虚拟化。Docker改变了虚拟化的方式,使开发者可以直接将自己的成果放入Docker中进行管理。方便快捷已经是 Docker的最大优势,过去需要用数天乃至数周的 任务,在Docker容器的处理下,只需要数秒就能完成。
  2. 避免选择恐惧症
    如果你有选择恐惧症,还是资深患者。那么你可以使用 Docker 打包你的纠结!比如 Docker 镜像;Docker 镜像中包含了运行环境和配置,所以 Docker 可以简化部署多种应用实例工作。比如 Web 应用、后台应用、数据库应用、大数据应用比如 Hadoop 集群、消息队列等等都可以打包成一个镜像部署。
  3. 节省开支
    一方面,云计算时代到来,使开发者不必为了追求效果而配置高额的硬件,Docker 改变了高性能必然高价格的思维定势。Docker 与云的结合,让云空间得到更充分的利用。不仅解决了硬件管理的问题,也改变了虚拟化的方式。

Docker 架构

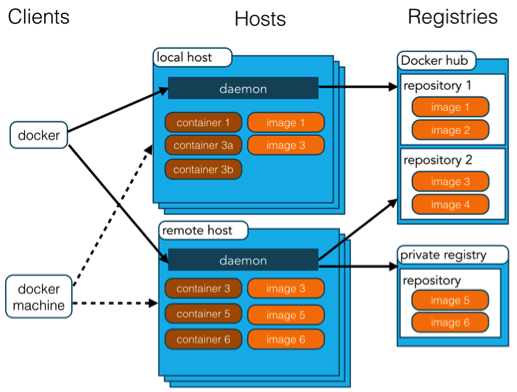
  • Docker 使用客户端-服务器 (C/S) 架构模式,使用远程API来管理和创建Docker容器。
  • Docker 容器通过 Docker 镜像来创建。
  • 容器与镜像的关系类似于面向对象编程中的对象与类。
Docker面向对象
容器对象
镜像

Docker 镜像(Images)Docker 镜像是用于创建 Docker 容器的模板。
Docker 容器(Container)容器是独立运行的一个或一组应用。
Docker 客户端(Client)Docker 客户端通过命令行或者其他工具使用 Docker API (https://docs.docker.com/reference/api/docker_remote_api) 与 Docker 的守护进程通信。
Docker 主机(Host)一个物理或者虚拟的机器用于执行 Docker 守护进程和容器。
Docker 仓库(Registry)Docker 仓库用来保存镜像,可以理解为代码控制中的代码仓库。 Docker Hub(https://hub.docker.com) 提供了庞大的镜像集合供使用。
Docker MachineDocker Machine是一个简化Docker安装的命令行工具,通过一个简单的命令行即可在相应的平台上安装Docker,比如VirtualBox、 Digital Ocean、Microsoft Azure。

Docker 安装

Ubuntu Docker 安装

Docker 支持以下的 Ubuntu 版本:

  • Ubuntu Precise 12.04 (LTS)
  • Ubuntu Trusty 14.04 (LTS)
  • Ubuntu Wily 15.10
  • Xenial 16.04 (LTS)
  • 其他更新的版本……

    如果安装 Docker ce 需要 16.04 及以上版本,安装步骤可以查看笔记部分:

    • Cosmic 18.10
    • Bionic 18.04 (LTS)
    • Xenial 16.04 (LTS)

前提条件

Docker 要求 Ubuntu 系统的内核版本高于 3.10 ,查看本页面的前提条件来验证你的 Ubuntu 版本是否支持 Docker。

通过 uname -r 命令查看你当前的内核版本:

1
$ uname -r

使用脚本安装 Docker

  1. 获取最新版本的 Docker 安装包
    1
    $ wget -qO- https://get.docker.com/ | sh

输入当前用户的密码后,就会下载脚本并且安装Docker及依赖包。

安装完成后有个提示:

1
2
3
4
5
 If you would like to use Docker as a non-root user, you should now consider
adding your user to the "docker" group with something like:

sudo usermod -aG docker runoob
Remember that you will have to log out and back in for this to take effect!

当要以非root用户可以直接运行docker时,需要执行 sudo usermod -aG docker runoob 命令,然后重新登陆,否则会有如下报错:

  1. 启动docker 后台服务
1
$ sudo service docker start
  1. 测试运行hello-world
1
$ docker run hello-world

镜像加速

鉴于国内网络问题,后续拉取 Docker 镜像十分缓慢,我们可以需要配置加速器来解决,我使用的是网易的镜像地址:http://hub-mirror.c.163.com。

新版的 Docker 使用 /etc/docker/daemon.json(Linux) 或者 %programdata%\docker\config\daemon.json(Windows) 来配置 Daemon。

请在该配置文件中加入(没有该文件的话,请先建一个):

1
2
3
{
"registry-mirrors": ["http://hub-mirror.c.163.com"]
}

Ubuntu 16.04 安装 Docker

1.选择国内的云服务商,这里选择阿里云为例

1
curl -sSL http://acs-public-mirror.oss-cn-hangzhou.aliyuncs.com/docker-engine/internet | sh -

2.安装所需要的包

1
sudo apt-get install linux-image-extra-$(uname -r) linux-image-extra-virtual

3.添加使用 HTTPS 传输的软件包以及 CA 证书

1
2
sudo apt-get update
sudo apt-get install apt-transport-https ca-certificates

4.添加GPG密钥

1
sudo apt-key adv --keyserver hkp://p80.pool.sks-keyservers.net:80 --recv-keys 58118E89F3A912897C070ADBF76221572C52609D

5.添加软件源

1
echo "deb https://apt.dockerproject.org/repo ubuntu-xenial main" | sudo tee /etc/apt/sources.list.d/docker.list

6.添加成功后更新软件包缓存

1
sudo apt-get update

7.安装docker

1
sudo apt-get install docker-engine

8.启动 docker

1
2
sudo systemctl enable docker
sudo systemctl start docker

Ubuntu 18.04 安装 Docker-ce

1.更换国内软件源,推荐中国科技大学的源,稳定速度快(可选)

1
2
3
sudo cp /etc/apt/sources.list /etc/apt/sources.list.bak
sudo sed -i 's/archive.ubuntu.com/mirrors.ustc.edu.cn/g' /etc/apt/sources.list
sudo apt update

2.安装需要的包

1
sudo apt install apt-transport-https ca-certificates software-properties-common curl

3.添加 GPG 密钥,并添加 Docker-ce 软件源,这里还是以中国科技大学的 Docker-ce 源为例

1
2
3
curl -fsSL https://mirrors.ustc.edu.cn/docker-ce/linux/ubuntu/gpg | sudo apt-key add -
sudo add-apt-repository "deb [arch=amd64] https://mirrors.ustc.edu.cn/docker-ce/linux/ubuntu \
$(lsb_release -cs) stable"

4.添加成功后更新软件包缓存

1
sudo apt update

5.安装 Docker-ce

1
sudo apt install docker-ce

6.设置开机自启动并启动 Docker-ce(安装成功后默认已设置并启动,可忽略)

1
2
sudo systemctl enable docker
sudo systemctl start docker

7.测试运行

1
sudo docker run hello-world

8.添加当前用户到 docker 用户组,可以不用 sudo 运行 docker(可选)

1
2
sudo groupadd docker
sudo usermod -aG docker $USER

9.测试添加用户组(可选)

1
docker run hello-world

CentOS Docker 安装

Docker支持以下的CentOS版本:

  • CentOS 7 (64-bit)
  • CentOS 6.5 (64-bit) 或更高的版本

前提条件

目前,CentOS 仅发行版本中的内核支持 Docker。

Docker 运行在 CentOS 7 上,要求系统为64位、系统内核版本为 3.10 以上。

Docker 运行在 CentOS6.5 或更高的版本的 CentOS 上,要求系统为64位、系统内核版本为 2.6.32-431 或者更高版本。

使用 yum 安装(CentOS 7下)

Docker 要求 CentOS 系统的内核版本高于 3.10 ,查看本页面的前提条件来验证你的CentOS 版本是否支持 Docker 。
通过 uname -r 命令查看你当前的内核版本

1
# uname -r

从 2017 年 3 月开始 docker 在原来的基础上分为两个分支版本: Docker CE 和 Docker EE。

Docker CE 即社区免费版,Docker EE 即企业版,强调安全,但需付费使用。

本文介绍 Docker CE 的安装使用。

移除旧的版本:

1
2
3
4
5
6
7
8
9
10
$ sudo yum remove docker \
docker-client \
docker-client-latest \
docker-common \
docker-latest \
docker-latest-logrotate \
docker-logrotate \
docker-selinux \
docker-engine-selinux \
docker-engine

安装一些必要的系统工具:

1
sudo yum install -y yum-utils device-mapper-persistent-data lvm2

添加软件源信息:

1
sudo yum-config-manager --add-repo http://mirrors.aliyun.com/docker-ce/linux/centos/docker-ce.repo

Docker支持以下的CentOS版本:

CentOS 7 (64-bit)
CentOS 6.5 (64-bit) 或更高的版本

前提条件

目前,CentOS 仅发行版本中的内核支持 Docker。

Docker 运行在 CentOS 7 上,要求系统为64位、系统内核版本为 3.10 以上。

Docker 运行在 CentOS-6.5 或更高的版本的 CentOS 上,要求系统为64位、系统内核版本为 2.6.32-431 或者更高版本。
使用 yum 安装(CentOS 7下)

Docker 要求 CentOS 系统的内核版本高于 3.10 ,查看本页面的前提条件来验证你的CentOS 版本是否支持 Docker 。
通过 uname -r 命令查看你当前的内核版本

[root@runoob ~]# uname -r

安装 Docker

从 2017 年 3 月开始 docker 在原来的基础上分为两个分支版本: Docker CE 和 Docker EE。

Docker CE 即社区免费版,Docker EE 即企业版,强调安全,但需付费使用。

本文介绍 Docker CE 的安装使用。

移除旧的版本:

1
2
3
4
5
6
7
8
9
10
# yum remove docker \
docker-client \
docker-client-latest \
docker-common \
docker-latest \
docker-latest-logrotate \
docker-logrotate \
docker-selinux \
docker-engine-selinux \
docker-engine

安装一些必要的系统工具:

1
# yum install -y yum-utils device-mapper-persistent-data lvm2

添加软件源信息:

1
# yum-config-manager --add-repo http://mirrors.aliyun.com/docker-ce/linux/centos/docker-ce.repo

更新 yum 缓存:

1
# yum makecache fast

安装 Docker-ce:

1
# yum -y install docker-ce

启动 Docker 后台服务:

1
# systemctl start docker.service

测试运行 hello-world

1
2
3
4
5
6
7
8
9
10
11
12
13
14
15
16
17
18
19
20
21
22
23
24
25
26
27
# docker run hello-world
Unable to find image 'hello-world:latest' locally
latest: Pulling from library/hello-world
1b930d010525: Pull complete
Digest: sha256:6540fc08ee6e6b7b63468dc3317e3303aae178cb8a45ed3123180328bcc1d20f
Status: Downloaded newer image for hello-world:latest

Hello from Docker!
This message shows that your installation appears to be working correctly.

To generate this message, Docker took the following steps:
1. The Docker client contacted the Docker daemon.
2. The Docker daemon pulled the "hello-world" image from the Docker Hub.
(amd64)
3. The Docker daemon created a new container from that image which runs the
executable that produces the output you are currently reading.
4. The Docker daemon streamed that output to the Docker client, which sent it
to your terminal.

To try something more ambitious, you can run an Ubuntu container with:
$ docker run -it ubuntu bash

Share images, automate workflows, and more with a free Docker ID:
https://hub.docker.com/

For more examples and ideas, visit:
https://docs.docker.com/get-started/

由于本地没有hello-world这个镜像,所以会下载一个hello-world的镜像,并在容器内运行。

使用脚本安装 Docker

  1. 使用 sudo 或 root 权限登录 Centos。
  2. 确保 yum 包更新到最新。

    1
    # yum update
  3. 执行 Docker 安装脚本。

    1
    2
    # curl -fsSL https://get.docker.com -o get-docker.sh
    # sh get-docker.sh

执行这个脚本会添加 docker.repo 源并安装 Docker。

  1. 启动 Docker 进程。

    1
    # systemctl start docker.service
  2. 验证 docker 是否安装成功并在容器中执行一个测试的镜像。

    1
    2
    # docker run hello-world
    # docker ps

到此,Docker 在 CentOS 系统的安装完成。

镜像加速

鉴于国内网络问题,后续拉取 Docker 镜像十分缓慢,我们可以需要配置加速器来解决,我使用的是网易的镜像地址:http://hub-mirror.c.163.com。

新版的 Docker 使用 /etc/docker/daemon.json(Linux) 或者 %programdata%\docker\config\daemon.json(Windows) 来配置 Daemon。

请在该配置文件中加入(没有该文件的话,请先建一个):

1
2
3
{
"registry-mirrors": ["http://hub-mirror.c.163.com"]
}

删除 Docker CE

执行以下命令来删除 Docker CE:

1
2
# yum remove docker-ce
# rm -rf /var/lib/docker

Windows Docker 安装

win7、win8 系统

win7、win8 等需要利用 docker toolbox 来安装,国内可以使用阿里云的镜像来下载,下载地址:http://mirrors.aliyun.com/docker-toolbox/windows/docker-toolbox/

docker toolbox 是一个工具集,它主要包含以下一些内容:

Docker CLI 客户端,用来运行docker引擎创建镜像和容器
Docker Machine. 可以让你在windows的命令行中运行docker引擎命令
Docker Compose. 用来运行docker-compose命令
Kitematic. 这是Docker的GUI版本
Docker QuickStart shell. 这是一个已经配置好Docker的命令行环境
Oracle VM Virtualbox. 虚拟机

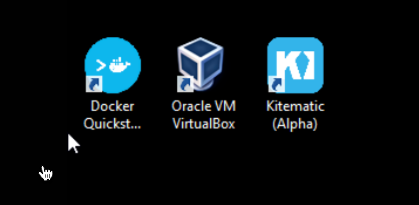
下载完成之后直接点击安装,安装成功后,桌边会出现三个图标,入下图所示:
如果系统显示 User Account Control 窗口来运行 VirtualBox 修改你的电脑,选择 Yes。
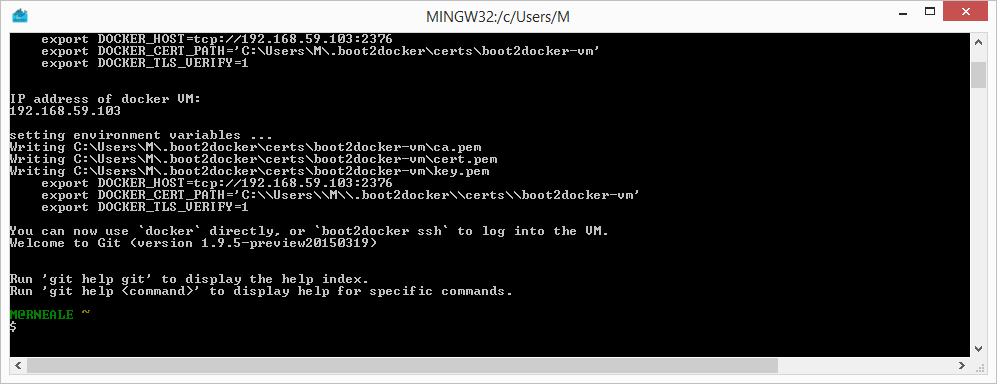
$ 符号那你可以输入以下命令来执行

1
2
3
4
5
6
7
8
9
10
11
12
13
14
15
16
17
18
19
20
21
22
23
$ docker run hello-world
Unable to find image 'hello-world:latest' locally
Pulling repository hello-world
91c95931e552: Download complete
a8219747be10: Download complete
Status: Downloaded newer image for hello-world:latest
Hello from Docker.
This message shows that your installation appears to be working correctly.

To generate this message, Docker took the following steps:
1. The Docker Engine CLI client contacted the Docker Engine daemon.
2. The Docker Engine daemon pulled the "hello-world" image from the Docker Hub.
(Assuming it was not already locally available.)
3. The Docker Engine daemon created a new container from that image which runs the
executable that produces the output you are currently reading.
4. The Docker Engine daemon streamed that output to the Docker Engine CLI client, which sent it
to your terminal.

To try something more ambitious, you can run an Ubuntu container with:
$ docker run -it ubuntu bash

For more examples and ideas, visit:
https://docs.docker.com/userguide/

Win10 系统

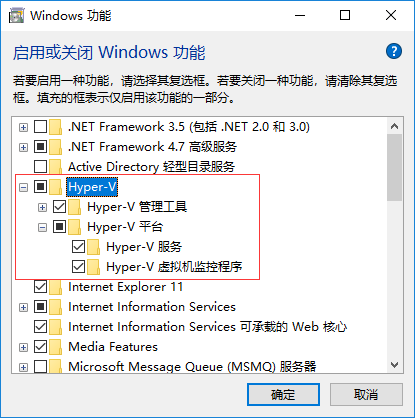
现在 Docker 有专门的 Win10 专业版系统的安装包,需要开启Hyper-V。

应用和功能 -> 程序和功能 -> 启用或关闭Windows功能 -> 选中Hyper-V
  1. 安装 Toolbox

最新版 Toolbox 下载地址: https://www.docker.com/get-docker

点击 Download Desktop and Take a Tutorial,并下载 Windows 的版本,如果你还没有登录,会要求注册登录:

  1. 运行安装文件

双击下载的 Docker for Windows Installer 安装文件,一路 Next,点击 Finish 完成安装。

安装完成后,Docker 会自动启动。通知栏上会出现个小鲸鱼的图标,这表示 Docker 正在运行。

桌边也会出现三个图标,我们可以在命令行执行 docker version 来查看版本号,docker run hello-world 来载入测试镜像测试。

如果没启动,你可以在 Windows 搜索 Docker 来启动,启动后,也可以在通知栏上看到小鲸鱼图标

镜像加速

鉴于国内网络问题,后续拉取 Docker 镜像十分缓慢,我们可以需要配置加速器来解决,我使用的是网易的镜像地址:http://hub-mirror.c.163.com。

新版的 Docker 使用 /etc/docker/daemon.json(Linux) 或者 %programdata%\docker\config\daemon.json(Windows) 来配置 Daemon。

请在该配置文件中加入(没有该文件的话,请先建一个):

1
2
3
{
"registry-mirrors": ["http://hub-mirror.c.163.com"]
}

MacOS Docker 安装

使用 Homebrew 安装

macOS 我们可以使用 Homebrew 来安装 Docker。

Homebrew 的 Cask 已经支持 Docker for Mac,因此可以很方便的使用 Homebrew Cask 来进行安装:

1
2
3
4
5
6
7
8
9
10
11
12
$ brew cask install docker

==> Creating Caskroom at /usr/local/Caskroom
==> We'll set permissions properly so we won't need sudo in the future
Password: # 输入 macOS 密码
==> Satisfying dependencies
==> Downloading https://download.docker.com/mac/stable/21090/Docker.dmg
######################################################################## 100.0%
==> Verifying checksum for Cask docker
==> Installing Cask docker
==> Moving App 'Docker.app' to '/Applications/Docker.app'.
🍺 docker was successfully installed!

在载入 Docker app 后,点击 Next,可能会询问你的 macOS 登陆密码,你输入即可。之后会弹出一个 Docker 运行的提示窗口,状态栏上也有有个小鲸鱼的图标。

手动下载安装

如果需要手动下载,请点击以下链接下载 StableEdge 版本的 Docker for Mac。

如同 macOS 其它软件一样,安装也非常简单,双击下载的 .dmg 文件,然后将鲸鱼图标拖拽到 Application 文件夹即可。

从应用中找到 Docker 图标并点击运行。可能会询问 macOS 的登陆密码,输入即可。

点击顶部状态栏中的鲸鱼图标会弹出操作菜单。

第一次点击图标,可能会看到这个安装成功的界面,点击 “Got it!” 可以关闭这个窗口。

启动终端后,通过命令可以检查安装后的 Docker 版本。

1
2
$ docker --version
Docker version 17.09.1-ce, build 19e2cf6

镜像加速

鉴于国内网络问题,后续拉取 Docker 镜像十分缓慢,我们可以需要配置加速器来解决,我使用的是网易的镜像地址:http://hub-mirror.c.163.com。

在任务栏点击 Docker for mac 应用图标 -> Perferences… -> Daemon -> Registry mirrors。在列表中填写加速器地址即可。修改完成之后,点击 Apply & Restart 按钮,Docker 就会重启并应用配置的镜像地址了。
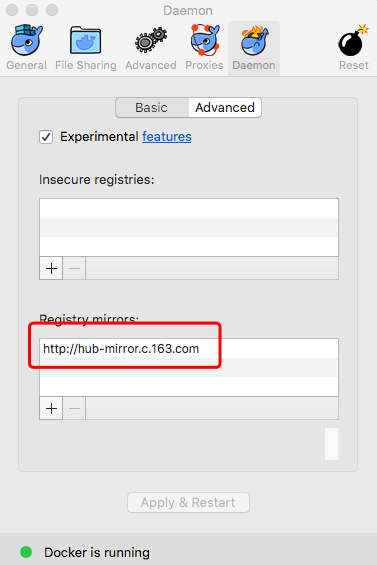
之后我们可以通过 docker info 来查看是否配置成功。

1
2
3
4
5
$ docker info
...
Registry Mirrors:
http://hub-mirror.c.163.com
Live Restore Enabled: false

Docker 使用

Docker Hello World

Docker 允许你在容器内运行应用程序, 使用 docker run 命令来在容器内运行一个应用程序。

输出Hello world

1
2
3
4
5
6
7
# docker run centos /bin/echo "Hello world"
Unable to find image 'centos:latest' locally
latest: Pulling from library/centos
8ba884070f61: Pull complete
Digest: sha256:a799dd8a2ded4a83484bbae769d97655392b3f86533ceb7dd96bbac929809f3c
Status: Downloaded newer image for centos:latest
Hello world

各个参数解析:

  • docker: Docker 的二进制执行文件。
  • run: 与前面的 docker 组合来运行一个容器。
  • ceentos 指定要运行的镜像,Docker首先从本地主机上查找镜像是否存在,如果不存在,Docker 就会从镜像仓库 Docker Hub 下载公共镜像。
  • /bin/echo “Hello world”: 在启动的容器里执行的命令

以上命令完整的意思可以解释为:Docker 以 centos 镜像创建一个新容器,然后在容器里执行 bin/echo “Hello world”,然后输出结果。

搜索docker hub中的镜像

1
# docker search centos

运行交互式的容器

我们通过docker的两个参数 -i -t,让docker运行的容器实现”对话”的能力

1
2
[root@localhost ~]# docker run -i -t centos /bin/bash
[root@f566b922be2f /]#

各个参数解析:

  • -t:在新容器内指定一个伪终端或终端。
  • -i:允许你对容器内的标准输入 (STDIN) 进行交互。

我们可以通过运行exit命令或者使用CTRL+D来退出容器。

启动容器 (后台模式)

使用以下命令创建一个以进程方式运行的容器:

1
2
[root@localhost ~]# docker run -d centos /bin/sh -c "while true; do echo hello world; sleep 1; done"
7e436b86913579f28f56b9b038e4782570b5beeb150e2e0ecd440201124814dc

在输出中,我们没有看到期望的”hello world”,而是一串长字符,这个长字符串叫做容器ID,对每个容器来说都是唯一的,我们可以通过容器ID来查看对应的容器发生了什么。

首先,我们需要确认容器有在运行,可以通过 docker ps 来查看

1
2
3
[root@localhost ~]# docker ps
CONTAINER ID IMAGE COMMAND CREATED STATUS PORTS NAMES
7e436b869135 centos "/bin/sh -c 'while t…" 43 seconds ago Up 42 seconds competent_merkle

CONTAINER ID:容器ID
NAMES:自动分配的容器名称

在容器内使用docker logs命令,查看容器内的标准输出:

1
2
3
// 如下两个命令的输出结果一致,都是好多个hello world
# docker logs 7e436b869135
# docker logs competent_merkle

停止容器

我们使用 docker stop 命令来停止容器:

1
# docker stop 7e436b869135

通过docker ps查看,容器已经停止工作:

1
# docker ps

也可以用下面的命令来停止:

1
# docker stop competent_merkle

Docker 容器使用

Docker 客户端

直接输入 docker 命令来查看到 Docker 客户端的所有命令选项。
可以通过命令 docker command –help 更深入的了解指定的 Docker 命令使用方法。
例如我们要查看 docker stats 指令的具体使用方法:

1
2
3
4
5
6
7
8
9
10
11
[root@localhost ~]# docker stats --help

Usage: docker stats [OPTIONS] [CONTAINER...]

Display a live stream of container(s) resource usage statistics

Options:
-a, --all Show all containers (default shows just running)
--format string Pretty-print images using a Go template
--no-stream Disable streaming stats and only pull the first result
--no-trunc Do not truncate output

运行一个web应用

在docker容器中运行一个 Python Flask 应用来运行一个web应用。

1
2
3
4
5
6
7
8
9
10
11
12
13
14
15
16
17
18
19
20
21
22
23
24
25
26
[root@localhost ~]# docker pull training/webapp # 载入镜像
Using default tag: latest
latest: Pulling from training/webapp
e190868d63f8: Pulling fs layer
909cd34c6fd7: Pulling fs layer
0b9bfabab7c1: Downloading
a3ed95caeb02: Waiting
10bbbc0fc0ff: Waiting
fca59b508e9f: Waiting
e7ae2541b15b: Waiting
9dd97ef58ce9: Waiting
a4c1b0cb7af7: Waiting
latest: Pulling from training/webapp
e190868d63f8: Pull complete
909cd34c6fd7: Pull complete
0b9bfabab7c1: Pull complete
a3ed95caeb02: Pull complete
10bbbc0fc0ff: Pull complete
fca59b508e9f: Pull complete
e7ae2541b15b: Pull complete
9dd97ef58ce9: Pull complete
a4c1b0cb7af7: Pull complete
Digest: sha256:06e9c1983bd6d5db5fba376ccd63bfa529e8d02f23d5079b8f74a616308fb11d
Status: Downloaded newer image for training/webapp:latest
[root@localhost ~]# docker run -d -P training/webapp python app.py
ab3dc2ea803335fee98c58b9bd55a9ef01d58a4602d75ec95a8fa3a97e403f5e

参数说明:

  • -d:让容器在后台运行。
  • -P:将容器内部使用的网络端口映射到我们使用的主机上。

查看 WEB 应用容器

使用 docker ps 来查看我们正在运行的容器:

1
2
3
[root@localhost ~]# docker ps
CONTAINER ID IMAGE COMMAND CREATED STATUS PORTS NAMES
ab3dc2ea8033 training/webapp "python app.py" About a minute ago Up About a minute 0.0.0.0:32768->5000/tcp loving_turing

这里多了端口信息。

1
2
PORTS
0.0.0.0:32768->5000/tcp

Docker 开放了 5000 端口(默认 Python Flask 端口)映射到主机端口 32768 上。
这时我们可以通过浏览器访问WEB应用:http://192.168.0.130:32768

也可以通过 -p 参数来设置不一样的端口:

1
[root@localhost ~]# docker run -d -p 5000:5000 training/webapp python app.py

docker ps查看正在运行的容器

1
2
3
4
[root@localhost ~]# docker ps
CONTAINER ID IMAGE COMMAND CREATED STATUS PORTS NAMES
e18b3ff3ed87 training/webapp "python app.py" 3 seconds ago Up 2 seconds 0.0.0.0:5000->5000/tcp nervous_chandrasekhar
ab3dc2ea8033 training/webapp "python app.py" 4 minutes ago Up 4 minutes 0.0.0.0:32768->5000/tcp loving_turing

容器内部的 5000 端口映射到我们本地主机的 5000 端口上。

网络端口的快捷方式

通过 docker ps 命令可以查看到容器的端口映射,docker 还提供了另一个快捷方式 docker port,
使用 docker port 可以查看指定 (ID 或者名字)容器的某个确定端口映射到宿主机的端口号。

上面我们创建的 web 应用容器 ID 为 e18b3ff3ed87 名字为 nervous_chandrasekhar。

我可以使用 docker port e18b3ff3ed87 或 docker port nervous_chandrasekhar 来查看容器端口的映射情况。

1
2
3
4
[root@localhost ~]# docker port e18b3ff3ed87
5000/tcp -> 0.0.0.0:5000
[root@localhost ~]# docker port nervous_chandrasekhar
5000/tcp -> 0.0.0.0:5000

查看 WEB 应用程序日志

docker logs [ID或者名字] 可以查看容器内部的标准输出。

1
2
[root@localhost ~]# docker logs  -f e18b3ff3ed87 
* Running on http://0.0.0.0:5000/ (Press CTRL+C to quit)

-f:让 docker logs 像使用 tail -f 一样来输出容器内部的标准输出。
从上面,我们可以看到应用程序使用的是 5000 端口并且能够查看到应用程序的访问日志。

查看WEB应用程序容器的进程

还可以使用 docker top 来查看容器内部运行的进程

1
2
3
[root@localhost ~]# docker top e18b3ff3ed87
UID PID PPID C STIME TTY TIME CMD
root 21092 21074 0 04:45 ? 00:00:00 python app.py

检查 WEB 应用程序

使用 docker inspect 来查看 Docker 的底层信息。它会返回一个 JSON 文件记录着 Docker 容器的配置和状态信息。

1
2
3
4
5
6
7
8
9
10
11
12
13
14
15
16
17
18
19
20
21
22
23
[root@localhost ~]# docker inspect e18b3ff3ed87
[
{
"Id": "e18b3ff3ed87fd4a5bbcb4d7d49506c8b08fea2354b3e9a735370da143a132a4",
"Created": "2019-07-12T08:45:39.489607684Z",
"Path": "python",
"Args": [
"app.py"
],
"State": {
"Status": "running",
"Running": true,
"Paused": false,
"Restarting": false,
"OOMKilled": false,
"Dead": false,
"Pid": 21092,
"ExitCode": 0,
"Error": "",
"StartedAt": "2019-07-12T08:45:39.948487352Z",
"FinishedAt": "0001-01-01T00:00:00Z"
},
......

停止 WEB 应用容器

1
2
[root@localhost ~]# docker stop e18b3ff3ed87   
e18b3ff3ed87

重启WEB应用容器

1
2
[root@localhost ~]# docker start e18b3ff3ed87   
e18b3ff3ed87

docker ps -l 查询最后一次创建的容器:

1
2
3
[root@localhost ~]# docker ps -l
CONTAINER ID IMAGE COMMAND CREATED STATUS PORTS NAMES
e18b3ff3ed87 training/webapp "python app.py" 8 minutes ago Up 27 seconds 0.0.0.0:5000->5000/tcp nervous_chandrasekhar

正在运行的容器,我们可以使用 docker restart 命令来重启

移除WEB应用容器

使用 docker rm 命令来删除不需要的容器:

1
2
[root@localhost ~]# docker rm e18b3ff3ed87
e18b3ff3ed87

删除容器时,容器必须是停止状态,否则会报如下错误:

1
2
[root@localhost ~]# docker rm ab3dc2ea8033
Error response from daemon: You cannot remove a running container ab3dc2ea803335fee98c58b9bd55a9ef01d58a4602d75ec95a8fa3a97e403f5e. Stop the container before attempting removal or force remove

批量删除所有容器

1
[root@localhost ~]# docker rm `docker ps -a -q`

Docker 镜像使用

当运行容器时,使用的镜像如果在本地中不存在,docker 就会自动从 docker 镜像仓库中下载,默认是从 Docker Hub 公共镜像源下载。

下面我们来学习:

  1. 管理和使用本地 Docker 主机镜像
  2. 创建镜像

列出镜像列表

可以使用 docker images 来列出本地主机上的镜像。

1
2
3
4
5
6
[root@localhost ~]# docker images
REPOSITORY TAG IMAGE ID CREATED SIZE
centos latest 9f38484d220f 3 months ago 202MB
hello-world latest fce289e99eb9 6 months ago 1.84kB
ubuntu 15.10 9b9cb95443b5 2 years ago 137MB
training/webapp latest 6fae60ef3446 4 years ago 349MB

各个选项说明:

  • REPOSITORY:表示镜像的仓库源
  • TAG:镜像的标签
  • IMAGE ID:镜像ID
  • CREATED:镜像创建时间
  • SIZE:镜像大小

同一仓库源可以有多个 TAG,代表这个仓库源的不同版本,如ubuntu仓库源里,有15.10、14.04等多个不同的版本,我们使用 REPOSITORY:TAG 来定义不同的镜像。

所以,我们如果要使用版本为15.10的ubuntu系统镜像来运行容器时,命令如下:

1
2
[root@localhost ~]# docker run -t -i ubuntu:15.10 /bin/bash
root@0c8e4aa0064f:/#

如果要使用版本为14.04的ubuntu系统镜像来运行容器时,命令如下:

1
2
[root@localhost ~]# docker run -t -i ubuntu:14.04 /bin/bash
root@0c8e4aa0064f:/#

如果你不指定一个镜像的版本标签,例如你只使用 ubuntu,docker 将默认使用 ubuntu:latest 镜像。

获取一个新的镜像

当我们在本地主机上使用一个不存在的镜像时 Docker 就会自动下载这个镜像。如果我们想预先下载这个镜像,我们可以使用 docker pull 命令来下载它。

1
2
3
4
5
6
7
8
[root@localhost ~]# docker pull ubuntu:14.04
14.04: Pulling from library/ubuntu
a7344f52cb74: Pull complete
515c9bb51536: Pull complete
e1eabe0537eb: Pull complete
4701f1215c13: Pull complete
Digest: sha256:2f7c79927b346e436cc14c92bd4e5bd778c3bd7037f35bc639ac1589a7acfa90
Status: Downloaded newer image for ubuntu:14.04

下载完成后,我们可以直接使用这个镜像来运行容器。

查找镜像

可以从 Docker Hub 网站来搜索镜像,Docker Hub 网址为: https://hub.docker.com/

也可以使用 docker search 命令来搜索镜像。比如我们需要一个nginx的镜像来作为我们的web服务。我们可以通过 docker search 命令搜索 nginx 来寻找适合我们的镜像。

1
2
3
4
5
6
7
8
9
10
11
12
13
14
15
16
17
18
19
20
21
22
23
24
25
26
27
[root@localhost ~]# docker search nginx
NAME DESCRIPTION STARS OFFICIAL AUTOMATED
nginx Official build of Nginx. 11671 [OK]
jwilder/nginx-proxy Automated Nginx reverse proxy for docker con… 1627 [OK]
richarvey/nginx-php-fpm Container running Nginx + PHP-FPM capable of… 726 [OK]
bitnami/nginx Bitnami nginx Docker Image 69 [OK]
linuxserver/nginx An Nginx container, brought to you by LinuxS… 66
tiangolo/nginx-rtmp Docker image with Nginx using the nginx-rtmp… 48 [OK]
nginx/nginx-ingress NGINX Ingress Controller for Kubernetes 20
nginxdemos/hello NGINX webserver that serves a simple page co… 18 [OK]
schmunk42/nginx-redirect A very simple container to redirect HTTP tra… 17 [OK]
jlesage/nginx-proxy-manager Docker container for Nginx Proxy Manager 17 [OK]
crunchgeek/nginx-pagespeed Nginx with PageSpeed + GEO IP + VTS + more_s… 13
blacklabelops/nginx Dockerized Nginx Reverse Proxy Server. 12 [OK]
centos/nginx-18-centos7 Platform for running nginx 1.8 or building n… 11
centos/nginx-112-centos7 Platform for running nginx 1.12 or building … 9
webdevops/nginx Nginx container 8 [OK]
nginxinc/nginx-unprivileged Unprivileged NGINX Dockerfiles 8
sophos/nginx-vts-exporter Simple server that scrapes Nginx vts stats a… 5 [OK]
nginx/nginx-prometheus-exporter NGINX Prometheus Exporter 4
1science/nginx Nginx Docker images that include Consul Temp… 4 [OK]
mailu/nginx Mailu nginx frontend 3 [OK]
travix/nginx NGinx reverse proxy 2 [OK]
pebbletech/nginx-proxy nginx-proxy sets up a container running ngin… 2 [OK]
centos/nginx-110-centos7 Platform for running nginx 1.10 or building … 0
wodby/nginx Generic nginx 0 [OK]
ansibleplaybookbundle/nginx-apb An APB to deploy NGINX 0 [OK]

NAME:镜像仓库源的名称
DESCRIPTION:镜像的描述
OFFICIAL:是否docker官方发布

拖取镜像

使用上图中的nginx官方版本的镜像,使用命令 docker pull 来下载镜像。

1
2
3
4
5
6
7
8
[root@localhost ~]# docker pull nginx  
Using default tag: latest
latest: Pulling from library/nginx
fc7181108d40: Pull complete
d2e987ca2267: Pull complete
0b760b431b11: Pull complete
Digest: sha256:48cbeee0cb0a3b5e885e36222f969e0a2f41819a68e07aeb6631ca7cb356fed1
Status: Downloaded newer image for nginx:latest

下载完成后,我们就可以使用这个镜像了。

1
[root@localhost ~]# docker run nginx

创建镜像

当从docker镜像仓库中下载的镜像不能满足我们的需求时,我们可以通过以下两种方式对镜像进行更改。

  1. 从已经创建的容器中更新镜像,并且提交这个镜像
  2. 使用 Dockerfile 指令来创建一个新的镜像

更新镜像

更新镜像之前,需要使用镜像来创建一个容器。

1
2
[root@localhost ~]# docker run -t -i ubuntu:15.10 /bin/bash
root@387f1a8b1d86:/# apt-get update

在运行的容器内使用 apt-get update 命令进行更新。在完成操作之后,输入 exit命令来退出这个容器。

此时ID为387f1a8b1d86的容器,是按我们的需求更改的容器。我们可以通过命令 docker commit来提交容器副本。

1
2
[root@localhost ~]# docker commit -m="update" -a="sandu" 387f1a8b1d86 sandu/ubuntu:v2
sha256:02c1ed8e875ca80c6089694e486e3e0b39833b55c8252bc62bf019eb9c8b4bde

各个参数说明:

  • -m:提交的描述信息
  • -a:指定镜像作者
  • 387f1a8b1d86:容器ID
  • sandu/ubuntu:v2:指定要创建的目标镜像名
  • v2:表示的是TAG

然后可以使用 docker images 命令来查看我们的新镜像 sandu/ubuntu:v2:

1
2
3
4
5
6
7
8
9
[root@localhost ~]# docker images
REPOSITORY TAG IMAGE ID CREATED SIZE
sandu/ubuntu v2 02c1ed8e875c About a minute ago 137MB
nginx latest f68d6e55e065 10 days ago 109MB
ubuntu 14.04 2c5e00d77a67 8 weeks ago 188MB
centos latest 9f38484d220f 3 months ago 202MB
hello-world latest fce289e99eb9 6 months ago 1.84kB
ubuntu 15.10 9b9cb95443b5 2 years ago 137MB
training/webapp latest 6fae60ef3446 4 years ago 349MB

使用我们的新镜像 sandu/ubuntu来启动一个容器

1
2
[root@localhost ~]# docker run -t -i sandu/ubuntu:v2 /bin/bash
root@f396a8f61f80:/#

构建镜像

使用命令 docker build , 从零开始来创建一个新的镜像。首先需要创建一个 Dockerfile 文件,其中包含一组指令来告诉 Docker 如何构建我们的镜像。

注意:这里使用一个使用flask框架的后台模板,GitHub地址

1
2
3
4
5
6
7
8
9
10
11
12
13
[root@localhost ~]# cat Dockerfile
FROM python:3.6

ENV FLASK_APP gentelella.py

COPY gentelella.py gunicorn.py requirements.txt config.py .env ./
COPY app app
COPY migrations migrations

RUN pip install -r requirements.txt

EXPOSE 5000
CMD ["gunicorn", "--config", "gunicorn.py", "gentelella:app"]

每一个指令都会在镜像上创建一个新的层,每一个指令的前缀都必须是大写的。
第一条FROM,指定使用哪个镜像源
RUN 指令告诉docker 在镜像内执行命令,安装了什么
然后使用 Dockerfile 文件,通过 docker build 命令来构建一个镜像。

1
[root@localhost flask-gentelella-master]# docker build -t sandu/python:3.6 .

参数说明:

  • -t :指定要创建的目标镜像名
  • . :Dockerfile 文件所在目录,可以指定Dockerfile 的绝对路径

使用docker images 查看创建的镜像已经在列表中存在,镜像ID为3fc000939e8e

1
2
3
4
5
6
7
8
9
10
11
[root@localhost ~]# docker images
REPOSITORY TAG IMAGE ID CREATED SIZE
sandu/python 3.6 3fc000939e8e 7 minutes ago 1.05GB
sandu/ubuntu v2 02c1ed8e875c About an hour ago 137MB
python 3.6 f93001dcf9ed 9 hours ago 924MB
nginx latest f68d6e55e065 10 days ago 109MB
ubuntu 14.04 2c5e00d77a67 8 weeks ago 188MB
centos latest 9f38484d220f 3 months ago 202MB
hello-world latest fce289e99eb9 6 months ago 1.84kB
ubuntu 15.10 9b9cb95443b5 2 years ago 137MB
training/webapp latest 6fae60ef3446 4 years ago 349MB

可以使用新的镜像来创建容器

1
2
3
4
5
[root@localhost ~]# docker run -d -p 5000:5000 --name gentelella --restart always sandu/python:3.6
de249d54cf992151db57c27d99b7f127bb6017b5233e2c7f97e36ebc97cae342
[root@localhost ~]# docker ps
CONTAINER ID IMAGE COMMAND CREATED STATUS PORTS NAMES
de249d54cf99 sandu/python:3.6 "gunicorn --config g…" 5 seconds ago Up 3 seconds 0.0.0.0:5000->5000/tcp gentelella

设置镜像标签

可以使用 docker tag 命令,为镜像添加一个新的标签。

docker tag 镜像ID,这里是 3fc000939e8e ,用户名称、镜像源名(repository name)和新的标签名(tag)。

使用 docker images 命令可以看到,ID为3fc000939e8e的镜像多一个pro标签。

1
2
3
4
5
6
7
8
9
10
11
12
13
14
15
16
17
18
19
20
21
22
23
24
[root@localhost ~]# docker images
REPOSITORY TAG IMAGE ID CREATED SIZE
sandu/python 3.6 3fc000939e8e 16 minutes ago 1.05GB
sandu/ubuntu v2 02c1ed8e875c About an hour ago 137MB
python 3.6 f93001dcf9ed 9 hours ago 924MB
nginx latest f68d6e55e065 10 days ago 109MB
ubuntu 14.04 2c5e00d77a67 8 weeks ago 188MB
centos latest 9f38484d220f 3 months ago 202MB
hello-world latest fce289e99eb9 6 months ago 1.84kB
ubuntu 15.10 9b9cb95443b5 2 years ago 137MB
training/webapp latest 6fae60ef3446 4 years ago 349MB
[root@localhost ~]# docker tag 3fc000939e8e sandu/python:pro
[root@localhost ~]# docker images
REPOSITORY TAG IMAGE ID CREATED SIZE
sandu/python 3.6 3fc000939e8e 17 minutes ago 1.05GB
sandu/python pro 3fc000939e8e 17 minutes ago 1.05GB
sandu/ubuntu v2 02c1ed8e875c About an hour ago 137MB
python 3.6 f93001dcf9ed 9 hours ago 924MB
nginx latest f68d6e55e065 10 days ago 109MB
ubuntu 14.04 2c5e00d77a67 8 weeks ago 188MB
centos latest 9f38484d220f 3 months ago 202MB
hello-world latest fce289e99eb9 6 months ago 1.84kB
ubuntu 15.10 9b9cb95443b5 2 years ago 137MB
training/webapp latest 6fae60ef3446 4 years ago 349MB

删除镜像

    1. 查看本地docker镜像
      1
      2
      3
      4
      5
      6
      7
      8
      9
      10
      11
      12
      [root@localhost ~]# docker images
      REPOSITORY TAG IMAGE ID CREATED SIZE
      sandu/python 3.6 3fc000939e8e 2 hours ago 1.05GB
      sandu/python pro 3fc000939e8e 2 hours ago 1.05GB
      sandu/ubuntu v2 02c1ed8e875c 3 hours ago 137MB
      python 3.6 f93001dcf9ed 11 hours ago 924MB
      nginx latest f68d6e55e065 10 days ago 109MB
      ubuntu 14.04 2c5e00d77a67 8 weeks ago 188MB
      centos latest 9f38484d220f 3 months ago 202MB
      hello-world latest fce289e99eb9 6 months ago 1.84kB
      ubuntu 15.10 9b9cb95443b5 2 years ago 137MB
      training/webapp latest 6fae60ef3446 4 years ago 349MB
  1. 尝试删除本地镜像,发现无法直接删除镜像

    1
    2
    [root@localhost ~]# docker rmi training/webapp
    Error response from daemon: conflict: unable to remove repository reference "training/webapp" (must force) - container ab3dc2ea8033 is using its referenced image 6fae60ef3446
  2. 原因分析: 有关联docker容器,无法删除

    1
    2
    # 查看镜像和容器的关联信息
    [root@localhost ~]# docker ps -a
  3. 删除docker容器

    1
    2
    3
    4
    # 先停止容器,然后再删除
    [root@localhost ~]# docker stop ab3dc2ea8033
    [root@localhost ~]# docker rm ab3dc2ea8033
    ab3dc2ea8033
  4. 删除docker镜像

    1
    2
    3
    4
    5
    6
    7
    8
    9
    10
    11
    12
    13
    14
    15
    16
    17
    [root@localhost ~]# docker rmi training/webapp
    Untagged: training/webapp:latest
    Untagged: training/webapp@sha256:06e9c1983bd6d5db5fba376ccd63bfa529e8d02f23d5079b8f74a616308fb11d
    Deleted: sha256:6fae60ef344644649a39240b94d73b8ba9c67f898ede85cf8e947a887b3e6557
    Deleted: sha256:875bde2b9e2d99e7c1362993645a474fe621475c6fc1b1623c9ed5312b7bdeae
    Deleted: sha256:bbdb5ee3757ef8f2633694016df5840fc3410422b37c22f98c0300e295ce75cc
    Deleted: sha256:d718446240e3f48a904ad4bbf2a1f61737c5d70df35b8210d674a9517cdc9803
    Deleted: sha256:a890440f4933412f9aafb056eb2f07f2276ed756631a81e960d4a8a6de5857a3
    Deleted: sha256:68a74799a9e67953725058ef21a530f100025088943446aa60c73fba7beebd47
    Deleted: sha256:b23e4b6b440d0e9ab4ffd7852fbf81edd6d5eb606e24d4950d83502e14af2856
    Deleted: sha256:f115b0453c71fb4d21fdb6f579201984bd5033ae28ed5908978576a19282418b
    Deleted: sha256:b0da82df3229cd06a2992449f2310caaa42f09fdfb088f4a98c5ea587ea85c7e
    Deleted: sha256:f6f162dad6e64715d3d07e21d4574733860a557f2f89228d07909c1f6f04e882
    Deleted: sha256:088f9eb16f16713e449903f7edb4016084de8234d73a45b1882cf29b1f753a5a
    Deleted: sha256:799115b9fdd1511e8af8a8a3c8b450d81aa842bbf3c9f88e9126d264b232c598
    Deleted: sha256:3549adbf614379d5c33ef0c5c6486a0d3f577ba3341f573be91b4ba1d8c60ce4
    Deleted: sha256:1154ba695078d29ea6c4e1adb55c463959cd77509adf09710e2315827d66271a
  5. 删除成功

    1
    2
    3
    4
    5
    6
    7
    8
    9
    10
    11
    [root@localhost ~]# docker images
    REPOSITORY TAG IMAGE ID CREATED SIZE
    sandu/python 3.6 3fc000939e8e 2 hours ago 1.05GB
    sandu/python pro 3fc000939e8e 2 hours ago 1.05GB
    sandu/ubuntu v2 02c1ed8e875c 3 hours ago 137MB
    python 3.6 f93001dcf9ed 11 hours ago 924MB
    nginx latest f68d6e55e065 10 days ago 109MB
    ubuntu 14.04 2c5e00d77a67 8 weeks ago 188MB
    centos latest 9f38484d220f 3 months ago 202MB
    hello-world latest fce289e99eb9 6 months ago 1.84kB
    ubuntu 15.10 9b9cb95443b5 2 years ago 137MB
  6. 批量删除所有镜像

1
[root@localhost ~]# docker rmi `docker images -q`

Docker 容器连接

网络端口映射

使用 -P 参数创建一个容器,使用 docker ps 可以看到容器端口 5000 绑定主机端口 32770。

1
2
3
4
5
[root@localhost ~]# docker run -d -P --name gentelella --restart always sandu/python:3.6
f386d3fcef079f51668f583cf88e6b20b5961a62502d2a1c09c6ed17ae526617
[root@localhost ~]# docker ps
CONTAINER ID IMAGE COMMAND CREATED STATUS PORTS NAMES
f386d3fcef07 sandu/python:3.6 "gunicorn --config g…" 5 seconds ago Up 4 seconds 0.0.0.0:32770->5000/tcp gentelella

也可以使用 -p 标识来指定容器端口绑定到主机端口。

1
2
3
4
5
[root@localhost ~]# docker run -d -p 32768:5000 --name gentelella --restart always sandu/python:3.6   
90680982825f131b6f950e3ad8543ddd51a76b07b75345376a852fe886c28754
[root@localhost ~]# docker ps
CONTAINER ID IMAGE COMMAND CREATED STATUS PORTS NAMES
90680982825f sandu/python:3.6 "gunicorn --config g…" 4 seconds ago Up 3 seconds 0.0.0.0:32768->5000/tcp gentelella

两种方式的区别是:

  • -P :是容器内部端口随机映射到主机的高端口。
  • -p : 是容器内部端口绑定到指定的主机端口。(主机端口:容器内部端口)

可以指定容器绑定的网络地址,比如绑定 127.0.0.1。

1
2
3
4
5
[root@localhost ~]# docker run -d -p 127.0.0.1:32768:5000 --name gentelella --restart always sandu/python:3.6
f4ff4bc6239e944b0683dd9c81f8af78793e69f02ace5ef3a251ee88cd296d93
[root@localhost ~]# docker ps
CONTAINER ID IMAGE COMMAND CREATED STATUS PORTS NAMES
f4ff4bc6239e sandu/python:3.6 "gunicorn --config g…" 4 seconds ago Up 3 seconds 127.0.0.1:32768->5000/tcp gentelella

这样我们就可以通过访问 127.0.0.1:32768 来访问容器的 5000 端口。

1
2
3
4
5
# 停止并删除容器
[root@localhost ~]# docker stop gentelella
gentelella
[root@localhost ~]# docker rm gentelella
gentelella

默认都是绑定 tcp 端口,如果要绑定 UDP 端口,可以在端口后面加上 /udp。

1
2
3
4
5
[root@localhost ~]# docker run -d -p 127.0.0.1:32768:5000/udp --name gentelella --restart always sandu/python:3.6
17683315e22f1c9c611fea955bd2824a6d324ee2d5f8647a9f5811f73339b1b1
[root@localhost ~]# docker ps
CONTAINER ID IMAGE COMMAND CREATED STATUS PORTS NAMES
17683315e22f sandu/python:3.6 "gunicorn --config g…" 4 seconds ago Up 3 seconds 5000/tcp, 127.0.0.1:32768->5000/udp gentelella

docker port 命令可以让我们快捷地查看端口的绑定情况。

1
2
3
4
5
# 默认是tcp端口,查看udp端口的话需要在最后加上/udp
[root@localhost ~]# docker port gentelella 5000
Error: No public port '5000/tcp' published for gentelella
[root@localhost ~]# docker port gentelella 5000/udp
127.0.0.1:32768

Docker容器连接

端口映射并不是唯一把 docker 连接到另一个容器的方法。
docker 有一个连接系统允许将多个容器连接在一起,共享连接信息。
docker 连接会创建一个父子关系,其中父容器可以看到子容器的信息。

容器命名

当我们创建一个容器的时候,docker 会自动对它进行命名。另外,我们也可以使用 –name 标识来命名容器,例如:

1
2
[root@localhost ~]# docker run -d -p 127.0.0.1:32768:5000 --name gentelella --restart always sandu/python:3.6
f4ff4bc6239e944b0683dd9c81f8af78793e69f02ace5ef3a251ee88cd296d93

可以使用 docker ps 命令来查看容器名称。

1
2
3
[root@localhost ~]# docker ps
CONTAINER ID IMAGE COMMAND CREATED STATUS PORTS NAMES
f4ff4bc6239e sandu/python:3.6 "gunicorn --config g…" 4 seconds ago Up 3 seconds 127.0.0.1:32768->5000/tcp gentelella

Docker实例

Docker 安装 Nginx

docker pull nginx 命令安装

查找 Docker Hub 上的 nginx 镜像

1
2
3
4
5
6
7
[root@localhost ~]# docker search nginx
NAME DESCRIPTION STARS OFFICIAL AUTOMATED
nginx Official build of Nginx. 11676 [OK]
jwilder/nginx-proxy Automated Nginx reverse proxy for docker con… 1627 [OK]
richarvey/nginx-php-fpm Container running Nginx + PHP-FPM capable of… 726 [OK]
bitnami/nginx Bitnami nginx Docker Image 69 [OK]
......

拉取官方的镜像

1
2
3
4
5
[root@localhost ~]# docker pull nginx
Using default tag: latest
latest: Pulling from library/nginx
Digest: sha256:48cbeee0cb0a3b5e885e36222f969e0a2f41819a68e07aeb6631ca7cb356fed1
Status: Image is up to date for nginx:latest

等待下载完成后,我们就可以在本地镜像列表里查到 REPOSITORY 为 nginx 的镜像。

1
2
3
[root@localhost ~]# docker images nginx
REPOSITORY TAG IMAGE ID CREATED SIZE
nginx latest f68d6e55e065 10 days ago 109MB

以下命令使用 NGINX 默认的配置来启动一个 Nginx 容器实例:

1
2
[root@localhost ~]# docker run --name test_docker_nginx -p 8081:80 -d nginx
c30cd0d51b31eaf3999ceee9724c269858e80417e8f0f03049127886f9b38134

参数解析:

  • test_docker_nginx:容器名称
  • -d:设置容器在后台一直运行
  • -p:端口进行映射,将本地的8081端口映射到容器内部的80端口

执行以上命令会生成一串字符串,类似c30cd0d51b31eaf3999ceee9724c269858e80417e8f0f03049127886f9b38134**,这个表示容器的 ID,一般可作为日志的文件名。

我们可以使用 docker ps 命令查看容器是否有在运行:

1
2
3
[root@localhost ~]# docker ps
CONTAINER ID IMAGE COMMAND CREATED STATUS PORTS NAMES
c30cd0d51b31 nginx "nginx -g 'daemon of…" 4 seconds ago Up 3 seconds 0.0.0.0:8081->80/tcp test_docker_nginx

PORTS 部分表示端口映射,本地的 8081 端口映射到容器内部的 80 端口。

在浏览器中打开 http://127.0.0.1:8081/ , 效果如下:
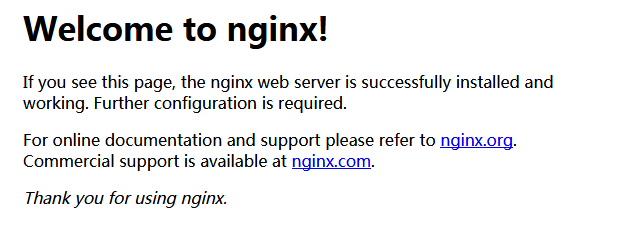
nginx 部署

首先,创建目录 nginx, 用于存放后面的相关东西。

1
2
3
4
5
6
[root@localhost ~]# mkdir -p /home/nginx/www /home/nginx/logs /home/nginx/conf
[root@localhost ~]# cd /home/
[root@localhost home]# ll
total 4
drwxr-xr-x. 6 root root 4096 Jul 12 05:55 flask-gentelella-master
drwxr-xr-x. 5 root root 41 Jul 12 07:47 nginx

拷贝容器内 Nginx 默认配置文件到本地当前目录下的 conf 目录,容器 ID 可以查看 docker ps 命令输入中的第一列:

1
2
3
4
[root@localhost ~]# docker ps
CONTAINER ID IMAGE COMMAND CREATED STATUS PORTS NAMES
c30cd0d51b31 nginx "nginx -g 'daemon of…" 4 seconds ago Up 3 seconds 0.0.0.0:8081->80/tcp test_docker_nginx
[root@localhost home]# docker cp c30cd0d51b31:/etc/nginx/nginx.conf /home/nginx/conf/

部署命令

1
2
3
4
5
[root@localhost home]# docker run -d -p 8081:80 --name test_docker_nginx_web -v /home/nginx/www:/usr/share/nginx/html -v /home/nginx/conf/nginx.conf:/etc/nginx/nginx.conf -v /home/nginx/logs:/var/log/nginx nginx
9c2fdc3888538ada9d904c0832c39487269185fea3bc9e0179326ccb7753bb98
[root@localhost home]# docker ps
CONTAINER ID IMAGE COMMAND CREATED STATUS PORTS NAMES
9c2fdc388853 nginx "nginx -g 'daemon of…" 3 seconds ago Up 2 seconds 0.0.0.0:8081->80/tcp test_docker_nginx_web

命令说明:

  • -p 8081:80: 将容器的 80 端口映射到主机的 8081 端口。
  • –name test_docker_nginx_web:将容器命名为test_docker_nginx_web。
  • -v /home/nginx/www:/usr/share/nginx/html:将我们自己创建的 www 目录挂载到容器的 /usr/share/nginx/html。
  • -v /home/nginx/conf/nginx.conf:/etc/nginx/nginx.conf:将我们自己创建的 nginx.conf 挂载到容器的 /etc/nginx/nginx.conf。
  • -v /home/nginx/logs:/var/log/nginx:将我们自己创建的 logs 挂载到容器的 /var/log/nginx。

启动以上命令后进入 /home/nginx/www 目录,创建 index.html 文件,内容如下:

1
2
3
4
5
6
7
8
9
10
11
<!DOCTYPE html>
<html>
<head>
<meta charset="utf-8">
<title>Docker教程</title>
</head>
<body>
<h1>我的第一个标题</h1>
<p>我的第一个段落。</p>
</body>
</html>

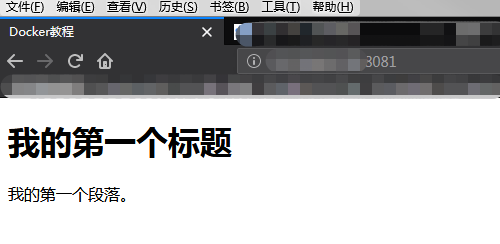
使用浏览器访问,输出结果如下:

相关命令

重新载入 NGINX 可以使用以下命令发送 HUP 信号到容器:

1
2
3
# docker kill -s HUP container-name
[root@localhost www]# docker kill -s HUP test_docker_nginx_web
test_docker_nginx_web

重启 NGINX 容器命令:

1
2
3
# docker restart container-name
[root@localhost www]# docker restart test_docker_nginx_web
test_docker_nginx_web

Docker 安装 PHP

安装 PHP 镜像

方法一、docker pull php

查找Docker Hub上的php镜像

1
2
3
4
5
6
7
[root@localhost www]# docker search php
NAME DESCRIPTION STARS OFFICIAL AUTOMATED
php While designed for web development, the PHP … 4607 [OK]
phpmyadmin/phpmyadmin A web interface for MySQL and MariaDB. 816 [OK]
php-zendserver Zend Server - the integrated PHP application… 168 [OK]
webdevops/php-nginx Nginx with PHP-FPM 132 [OK]
webdevops/php-apache-dev PHP with Apache for Development (eg. with xd… 105 [OK]

拉取官方的镜像,标签为5.6-fpm

1
2
3
4
5
6
7
8
9
10
11
12
13
14
[root@localhost ~]# docker pull php:5.6-fpm
5.6-fpm: Pulling from library/php
5e6ec7f28fb7: Pull complete
cf165947b5b7: Pull complete
7bd37682846d: Pull complete
99daf8e838e1: Pull complete
f8628c9f032f: Pull complete
50ff925cdfa2: Pull complete
6ab76f312877: Pull complete
28ea94b4dd82: Pull complete
a6dbb35d45d2: Pull complete
98b901ec9e8d: Pull complete
Digest: sha256:4f070f1b7b93cc5ab364839b79a5b26f38d5f89461f7bc0cd4bab4a3ad7d67d7
Status: Downloaded newer image for php:5.6-fpm

等待下载完成后,我们就可以在本地镜像列表里查到REPOSITORY为php,标签为5.6-fpm的镜像。

1
2
3
4
5
6
7
8
9
10
11
12
[root@localhost ~]# docker images
REPOSITORY TAG IMAGE ID CREATED SIZE
sandu/python 3.6 3fc000939e8e 2 hours ago 1.05GB
sandu/python pro 3fc000939e8e 2 hours ago 1.05GB
sandu/ubuntu v2 02c1ed8e875c 3 hours ago 137MB
python 3.6 f93001dcf9ed 11 hours ago 924MB
nginx latest f68d6e55e065 10 days ago 109MB
ubuntu 14.04 2c5e00d77a67 8 weeks ago 188MB
centos latest 9f38484d220f 3 months ago 202MB
php 5.6-fpm 3458979c7744 5 months ago 344MB
hello-world latest fce289e99eb9 6 months ago 1.84kB
ubuntu 15.10 9b9cb95443b5 2 years ago 137MB

Nginx + PHP 部署

启动 PHP:

1
2
[root@localhost ~]# docker run --name test_docker_php -v /home/nginx/www/:/www:ro -d php:5.6-fpm
dea92165f3271ed8a0651fdd6ef1738f321b462a2cba0cd2eee9e3885a315325

命令说明:

  • –name test_docker_php : 将容器命名为test_docker_php。
  • -v /home/nginx/www:/www : 将主机中项目的目录 www 挂载到容器的 /www,ro 表示只读

创建 /home/nginx/conf/conf.d 目录:
[root@localhost ~]# mkdir -p /home/nginx/conf/conf.d

在该目录下添加 /home/nginx/conf/conf.d/test_docker_php.conf 文件,内容如下:

1
2
3
4
5
6
7
8
9
10
11
12
13
14
15
16
17
18
19
20
21
server {
listen 80;
server_name localhost;

location / {
root /usr/share/nginx/html;
index index.html index.htm index.php;
}

error_page 500 502 503 504 /50x.html;
location = /50x.html {
root /usr/share/nginx/html;
}

location ~ \.php$ {
fastcgi_pass php:9000;
fastcgi_index index.php;
fastcgi_param SCRIPT_FILENAME /www/$fastcgi_script_name;
include fastcgi_params;
}
}

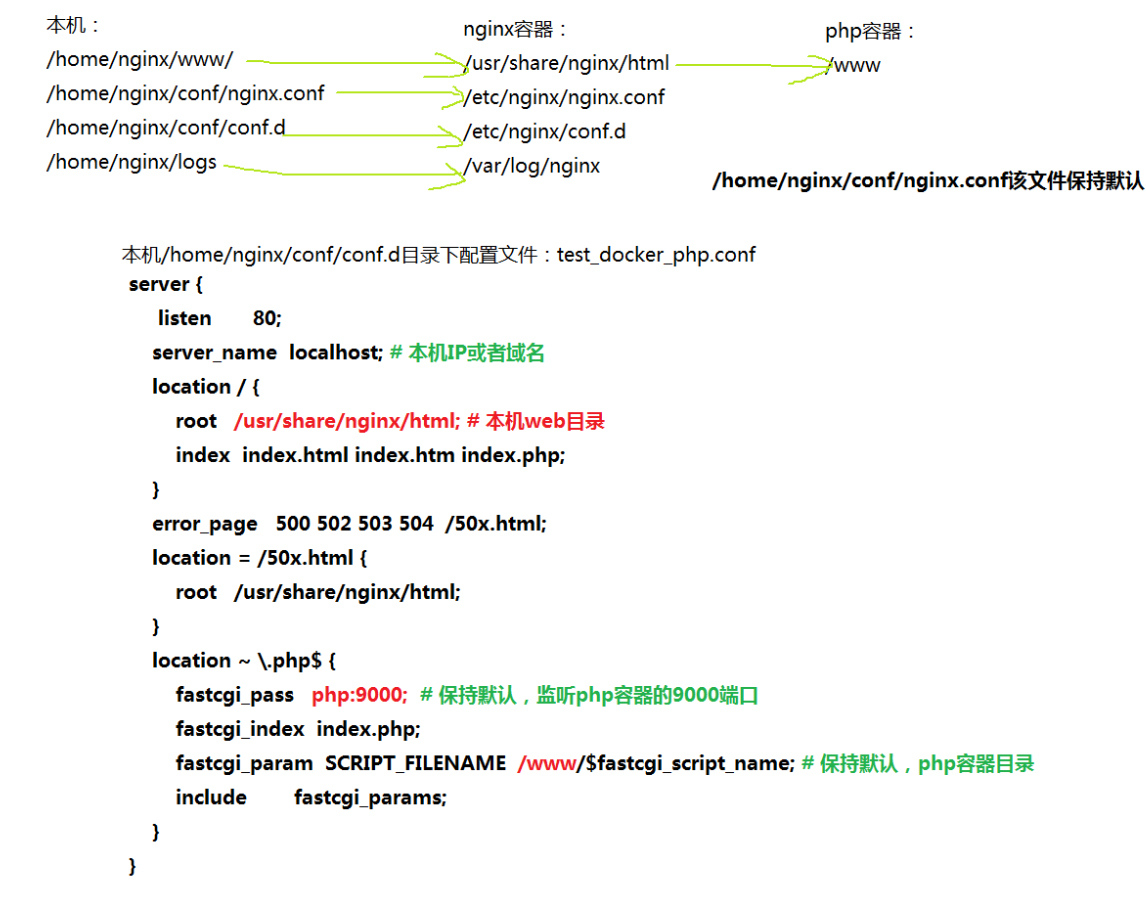
配置文件说明:

  • php:9000: 表示 php-fpm 服务的 URL。
  • /www/: 是 test_docker_php中 php 文件的存储路径,映射到本地的 /home/nginx/www 目录。

启动 Nginx :

1
2
[root@localhost conf.d]# docker run -d -p 8081:80 --name test_docker_nginx_web -v /home/nginx/www:/usr/share/nginx/html:ro -v /home/nginx/conf/nginx.conf:/etc/nginx/nginx.conf:ro  -v /home/nginx/conf/conf.d:/etc/nginx/conf.d:ro -v /home/nginx/logs:/var/log/nginx --link test_docker_php:php nginx
4737055f929d939b1201b1c215b011f2673e65e6bc2e769190cfee95ffb1458c

命令说明:

  • -p 8081:80: 端口映射,把 nginx 中的 80 映射到本地的 8083 端口。
  • /home/nginx/www: 是本地 html 文件的存储目录,/usr/share/nginx/html 是容器内 html 文件的存储目录。
  • /home/nginx/conf/conf.d: 是本地 nginx 配置文件的存储目录,/etc/nginx/conf.d 是容器内 nginx 配置文件的存储目录。
  • –link test_docker_php:php: 把 test_docker_php 的网络并入 nginx,并通过修改 nginx 的 /etc/hosts,把域名 php 映射成 127.0.0.1,让 nginx 通过 php:9000 访问 php-fpm。

接下来我们在 /home/nginx/www 目录下创建 index.php,代码如下:

1
2
3
<?php
echo phpinfo();
?>

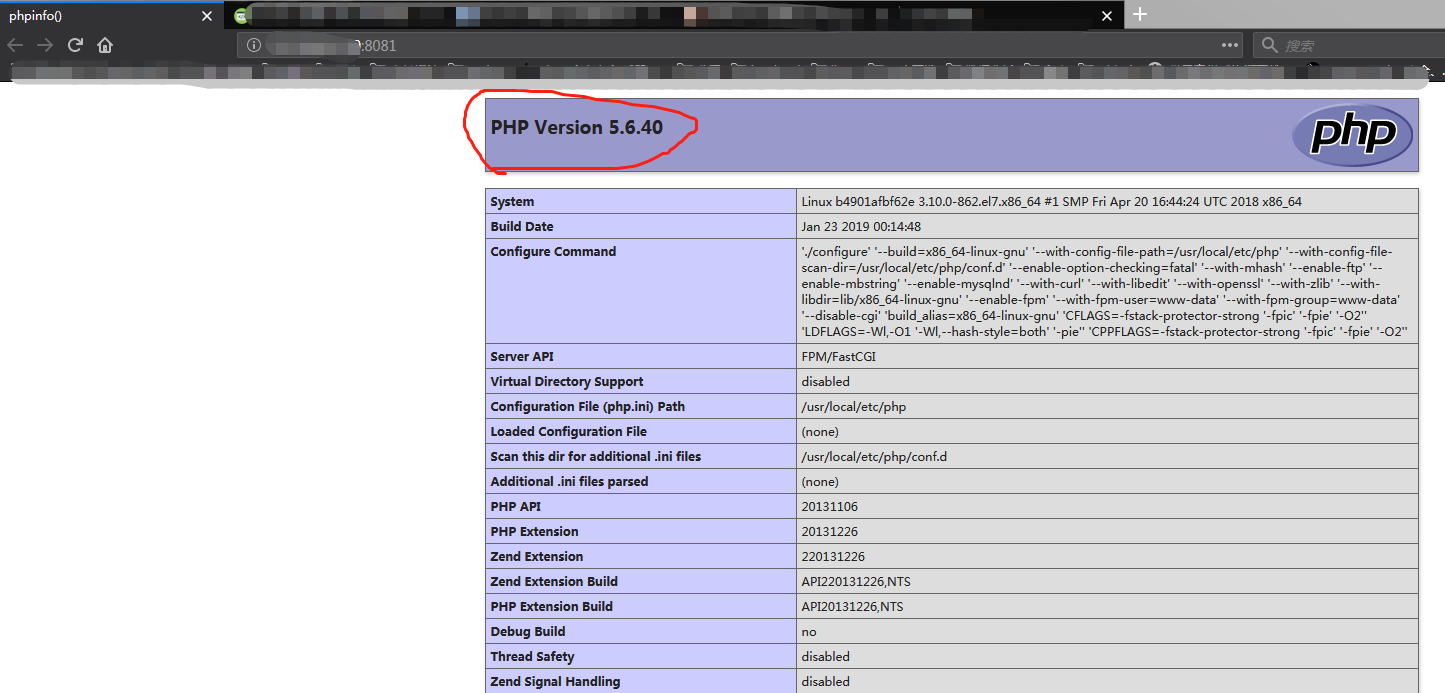
浏览器打开 http://ip:8081/index.php ,显示如下:

要点总结

  1. php容器路径是/www,对应本机的web目录/home/nginx/www/
  2. nginx容器web路径是/usr/share/nginx/html,对应本机web目录/home/nginx/www/
  3. nginx容器配置文件/etc/nginx/nginx.conf,对应本机/home/nginx/conf/nginx.conf
  4. nginx容器配置文件/etc/nginx/conf.d路径,对应本机/home/nginx/conf/conf.d路径
  5. 运行php容器时需要把php容器路径跟本机web路径做映射
  6. 运行nginx容器时需要把nginx容器相关的路径跟本机路径做映射
  7. nginx容器关联有php容易,所以先启动php容器,然后再启动nginx容器,否则会报错:
1
2
3
4
5
6
7
8
9
10
11
12
13
# 先启动php容器,然后再启动nginx容器
[root@localhost ~]# docker ps -a
CONTAINER ID IMAGE COMMAND CREATED STATUS PORTS NAMES
ff21bd0345f4 mysql:5.6 "docker-entrypoint.s…" 2 days ago Exited (255) 30 seconds ago 0.0.0.0:3306->3306/tcp test_docker_mysql
4737055f929d nginx "nginx -g 'daemon of…" 2 days ago Exited (255) 30 seconds ago 0.0.0.0:8081->80/tcp test_docker_nginx_web
b4901afbf62e php:5.6-fpm "docker-php-entrypoi…" 2 days ago Exited (255) 30 seconds ago 9000/tcp test_docker_php
[root@localhost ~]# docker start 4737055f929d
Error response from daemon: Cannot link to a non running container: /test_docker_php AS /test_docker_nginx_web/php
Error: failed to start containers: 4737055f929d
[root@localhost ~]# docker start b4901afbf62e
b4901afbf62e
[root@localhost ~]# docker start 4737055f929d
4737055f929d

相互关系如下图所示:

Docker 安装 MySQL

安装方法

方法一、docker pull mysql

查找Docker Hub上的mysql镜像

1
2
3
4
5
6
7
[root@localhost ~]# docker search mysql
NAME DESCRIPTION STARS OFFICIAL AUTOMATED
mysql MySQL is a widely used, open-source relation… 8385 [OK]
mariadb MariaDB is a community-developed fork of MyS… 2882 [OK]
mysql/mysql-server Optimized MySQL Server Docker images. Create… 624 [OK]
percona Percona Server is a fork of the MySQL relati… 438 [OK]
centurylink/mysql Image containing mysql. Optimized to be link… 60 [OK]

拉取官方的镜像,标签为5.6

1
[root@localhost ~]# docker pull mysql:5.6

等待下载完成后,我们就可以在本地镜像列表里查到REPOSITORY为mysql,标签为5.6的镜像。

1
2
[root@localhost ~]# docker images | grep mysql
mysql 5.6 3ed1080b793f 4 weeks ago 256MB

方法二、通过 Dockerfile构建

首先,创建目录mysql,用于存放后面的相关东西。

1
[root@localhost ~]# mkdir -p ~/mysql/data ~/mysql/logs ~/mysql/conf

命令说明:

  • data目录将映射为mysql容器配置的数据文件存放路径
  • logs目录将映射为mysql容器的日志目录
  • conf目录里的配置文件将映射为mysql容器的配置文件

进入创建的mysql目录,创建Dockerfile,这个是以Ubuntu系统为参考,CentOS系统使用的话需要修改

1
2
3
4
5
6
7
8
9
10
11
12
13
14
15
16
17
18
19
20
21
22
23
24
25
26
27
28
29
30
31
32
33
34
35
36
37
38
39
40
41
42
43
44
45
46
47
48
49
50
51
52
53
54
55
56
57
58
59
60
61
62
63
64
FROM debian:jessie

# add our user and group first to make sure their IDs get assigned consistently, regardless of whatever dependencies get added
RUN groupadd -r mysql && useradd -r -g mysql mysql

# add gosu for easy step-down from root
ENV GOSU_VERSION 1.7
RUN set -x \
&& apt-get update && apt-get install -y --no-install-recommends ca-certificates wget && rm -rf /var/lib/apt/lists/* \
&& wget -O /usr/local/bin/gosu "https://github.com/tianon/gosu/releases/download/$GOSU_VERSION/gosu-$(dpkg --print-architecture)" \
&& wget -O /usr/local/bin/gosu.asc "https://github.com/tianon/gosu/releases/download/$GOSU_VERSION/gosu-$(dpkg --print-architecture).asc" \
&& export GNUPGHOME="$(mktemp -d)" \
&& gpg --keyserver ha.pool.sks-keyservers.net --recv-keys B42F6819007F00F88E364FD4036A9C25BF357DD4 \
&& gpg --batch --verify /usr/local/bin/gosu.asc /usr/local/bin/gosu \
&& rm -r "$GNUPGHOME" /usr/local/bin/gosu.asc \
&& chmod +x /usr/local/bin/gosu \
&& gosu nobody true \
&& apt-get purge -y --auto-remove ca-certificates wget

RUN mkdir /docker-entrypoint-initdb.d

# FATAL ERROR: please install the following Perl modules before executing /usr/local/mysql/scripts/mysql_install_db:
# File::Basename
# File::Copy
# Sys::Hostname
# Data::Dumper
RUN apt-get update && apt-get install -y perl pwgen --no-install-recommends && rm -rf /var/lib/apt/lists/*

# gpg: key 5072E1F5: public key "MySQL Release Engineering <mysql-build@oss.oracle.com>" imported
RUN apt-key adv --keyserver ha.pool.sks-keyservers.net --recv-keys A4A9406876FCBD3C456770C88C718D3B5072E1F5

ENV MYSQL_MAJOR 5.6
ENV MYSQL_VERSION 5.6.31-1debian8

RUN echo "deb http://repo.mysql.com/apt/debian/ jessie mysql-${MYSQL_MAJOR}" > /etc/apt/sources.list.d/mysql.list

# the "/var/lib/mysql" stuff here is because the mysql-server postinst doesn't have an explicit way to disable the mysql_install_db codepath besides having a database already "configured" (ie, stuff in /var/lib/mysql/mysql)
# also, we set debconf keys to make APT a little quieter
RUN { \
echo mysql-community-server mysql-community-server/data-dir select ''; \
echo mysql-community-server mysql-community-server/root-pass password ''; \
echo mysql-community-server mysql-community-server/re-root-pass password ''; \
echo mysql-community-server mysql-community-server/remove-test-db select false; \
} | debconf-set-selections \
&& apt-get update && apt-get install -y mysql-server="${MYSQL_VERSION}" && rm -rf /var/lib/apt/lists/* \
&& rm -rf /var/lib/mysql && mkdir -p /var/lib/mysql /var/run/mysqld \
&& chown -R mysql:mysql /var/lib/mysql /var/run/mysqld \
# ensure that /var/run/mysqld (used for socket and lock files) is writable regardless of the UID our mysqld instance ends up having at runtime
&& chmod 777 /var/run/mysqld

# comment out a few problematic configuration values
# don't reverse lookup hostnames, they are usually another container
RUN sed -Ei 's/^(bind-address|log)/#&/' /etc/mysql/my.cnf \
&& echo 'skip-host-cache\nskip-name-resolve' | awk '{ print } $1 == "[mysqld]" && c == 0 { c = 1; system("cat") }' /etc/mysql/my.cnf > /tmp/my.cnf \
&& mv /tmp/my.cnf /etc/mysql/my.cnf

VOLUME /var/lib/mysql

COPY docker-entrypoint.sh /usr/local/bin/
RUN ln -s usr/local/bin/docker-entrypoint.sh /entrypoint.sh # backwards compat
ENTRYPOINT ["docker-entrypoint.sh"]

EXPOSE 3306
CMD ["mysqld"]

通过Dockerfile创建一个镜像,替换成你自己的名字

1
[root@localhost ~]# docker build -t mysql .

创建完成后,我们可以在本地的镜像列表里查找到刚刚创建的镜像

1
2
[root@localhost ~]# docker images |grep mysql
mysql 5.6 2c0964ec182a 3 minutes ago 329 MB

使用mysql镜像

运行容器

1
2
3
4
5
# 如下这个命令是使用本地目录跟MySQL镜像目录想匹配的,使用官方MySQL镜像可以直接使用,若是使用上述自定的的dockfile创建爱你的MySQL镜像,需要把路径换成实际创建时使用的路径
[root@localhost home]# mkdir mysql
[root@localhost home]# cd mysql
[root@localhost mysql]# docker run -p 3306:3306 --name test_docker_mysql -v $PWD/conf:/etc/mysql/conf.d -v $PWD/logs:/logs -v $PWD/data:/var/lib/mysql -e MYSQL_ROOT_PASSWORD=123456 -d mysql:5.6
ff21bd0345f43b46e148f40ecbcc129683bccfd7fbd5fe9778332e12ffc49ed6

命令说明:

  • -p 3306:3306:将容器的 3306 端口映射到主机的 3306 端口。
  • -v -v $PWD/conf:/etc/mysql/conf.d:将主机当前目录下的 conf/my.cnf 挂载到容器的 /etc/mysql/my.cnf。
  • -v $PWD/logs:/logs:将主机当前目录下的 logs 目录挂载到容器的 /logs。
  • -v $PWD/data:/var/lib/mysql :将主机当前目录下的data目录挂载到容器的 /var/lib/mysql 。
  • -e MYSQL_ROOT_PASSWORD=123456:初始化 root 用户的密码。

查看容器启动情况

1
2
3
4
5
6
7
8
9
10
11
12
13
14
15
16
17
18
19
20
21
22
23
24
# 查看当前正在运行的容器,发现没有MySQL容器
[root@localhost mysql]# docker ps
CONTAINER ID IMAGE COMMAND CREATED STATUS PORTS NAMES
4737055f929d nginx "nginx -g 'daemon of…" 37 minutes ago Up 37 minutes 0.0.0.0:8081->80/tcp test_docker_nginx_web
b4901afbf62e php:5.6-fpm "docker-php-entrypoi…" About an hour ago Up About an hour 9000/tcp test_docker_php
# 再次运行MySQL容器,报错,说是容器名已经存在
[root@localhost mysql]# docker run -p 3306:3306 --name test_docker_mysql -v $PWD/conf:/etc/mysql/conf.d -v $PWD/logs:/logs -v $PWD/data:/var/lib/mysql -e MYSQL_ROOT_PASSWORD=123456 -d mysql:5.6
docker: Error response from daemon: Conflict. The container name "/test_docker_mysql" is already in use by container "ff21bd0345f43b46e148f40ecbcc129683bccfd7fbd5fe9778332e12ffc49ed6". You have to remove (or rename) that container to be able to reuse that name.
See 'docker run --help'.
# 查看所有容器,发现有MySQL容器,状态是Exited
[root@localhost mysql]# docker ps -a
CONTAINER ID IMAGE COMMAND CREATED STATUS PORTS NAMES
ff21bd0345f4 mysql:5.6 "docker-entrypoint.s…" 2 minutes ago Exited (1) About a minute ago test_docker_mysql
4737055f929d nginx "nginx -g 'daemon of…" 38 minutes ago Up 38 minutes 0.0.0.0:8081->80/tcp test_docker_nginx_web
b4901afbf62e php:5.6-fpm "docker-php-entrypoi…" About an hour ago Up About an hour 9000/tcp test_docker_php
# 启动MySQL容器
[root@localhost mysql]# docker start ff21bd0345f4
ff21bd0345f4
# 查看当前正在运行的容器,看到MySQL容器已经运行
[root@localhost mysql]# docker ps
CONTAINER ID IMAGE COMMAND CREATED STATUS PORTS NAMES
ff21bd0345f4 mysql:5.6 "docker-entrypoint.s…" 3 minutes ago Up 21 seconds 0.0.0.0:3306->3306/tcp test_docker_mysql
4737055f929d nginx "nginx -g 'daemon of…" 38 minutes ago Up 38 minutes 0.0.0.0:8081->80/tcp test_docker_nginx_web
b4901afbf62e php:5.6-fpm "docker-php-entrypoi…" About an hour ago Up About an hour 9000/tcp test_docker_php

知识点

最新官方MySQL(5.7.19)的docker镜像在创建时映射的配置文件目录有所不同

MySQL(5.7.19)的默认配置文件是 /etc/mysql/my.cnf 文件。如果想要自定义配置,建议向 /etc/mysql/conf.d 目录中创建 .cnf 文件。新建的文件可以任意起名,只要保证后缀名是 cnf 即可。新建的文件中的配置项可以覆盖 /etc/mysql/my.cnf 中的配置项。

首先需要创建将要映射到容器中的目录以及.cnf文件,然后再创建容器

1
2
3
4
5
6
7
# pwd
/opt
# mkdir -p docker_v/mysql/conf
# cd docker_v/mysql/conf
# touch my.cnf
# docker run -p 3306:3306 --name mysql -v /opt/docker_v/mysql/conf:/etc/mysql/conf.d -e MYSQL_ROOT_PASSWORD=123456 -d imageID
4ec4f56455ea2d6d7251a05b7f308e314051fdad2c26bf3d0f27a9b0c0a71414

命令说明:

  • -p 3306:3306:将容器的3306端口映射到主机的3306端口
  • -v /opt/docker_v/mysql/conf:/etc/mysql/conf.d:将主机/opt/docker_v/mysql/conf目录挂载到容器的/etc/mysql/conf.d
  • -e MYSQL_ROOT_PASSWORD=123456:初始化root用户的密码
  • -d: 后台运行容器,并返回容器ID
  • imageID: mysql镜像ID

docker 安装 mysql 8 版本

1
2
3
4
5
6
7
8
9
10
11
12
13
14
15
16
# docker 中下载 mysql
docker pull mysql

#启动
docker run --name mysql -p 3306:3306 -e MYSQL_ROOT_PASSWORD=Lzslov123! -d mysql

#进入容器
docker exec -it mysql bash

#登录mysql
mysql -u root -p
ALTER USER 'root'@'localhost' IDENTIFIED BY 'Lzslov123!';

#添加远程登录用户
CREATE USER 'liaozesong'@'%' IDENTIFIED WITH mysql_native_password BY 'Lzslov123!';
GRANT ALL PRIVILEGES ON *.* TO 'liaozesong'@'%';

登录docker里的MySQL镜像和远程登录

  1. 首次使用如下命令启动docker里的MySQL镜像时:
1
2
3
4
5
6
7
8
9
10
11
12
13
14
15
16
17
18
19
20
21
22
23
24
25
26
27
28
29
30
31
32
33
34
35
36
37
38
[root@localhost ~]# cd /home/
[root@localhost home]# docker run -p 3306:3306 --name test_docker_mysql -v $PWD/conf:/etc/mysql/conf.d -v $PWD/logs:/logs -v $PWD/data:/var/lib/mysql -e MYSQL_ROOT_PASSWORD=123456 -d mysql:5.6
9d51b883e254d1a946af01c2edc0ed4c5a2155bf5118a5a3fcc8ff6c9053cfc7
[root@localhost home]# docker ps -a
CONTAINER ID IMAGE COMMAND CREATED STATUS PORTS NAMES
9d51b883e254 mysql:5.6 "docker-entrypoint.s…" 6 seconds ago Up 5 seconds 0.0.0.0:3306->3306/tcp test_docker_mysql
4737055f929d nginx "nginx -g 'daemon of…" 2 days ago Up 42 minutes 0.0.0.0:8081->80/tcp test_docker_nginx_web
b4901afbf62e php:5.6-fpm "docker-php-entrypoi…" 2 days ago Up 42 minutes 9000/tcp test_docker_php
[root@localhost home]# docker exec -it 9d51b883e254 bash
root@9d51b883e254:/# mysql -uroot -p
Enter password: # 需要输入初始密码123456
Welcome to the MySQL monitor. Commands end with ; or \g.
Your MySQL connection id is 1
Server version: 5.6.44 MySQL Community Server (GPL)

Copyright (c) 2000, 2019, Oracle and/or its affiliates. All rights reserved.

Oracle is a registered trademark of Oracle Corporation and/or its
affiliates. Other names may be trademarks of their respective
owners.

Type 'help;' or '\h' for help. Type '\c' to clear the current input statement.

mysql> show databases;
+--------------------+
| Database |
+--------------------+
| information_schema |
| mysql |
| performance_schema |
+--------------------+
3 rows in set (0.01 sec)

mysql> exit;
Bye
root@9d51b883e254:/# exit
exit
[root@localhost home]#
  1. 遇到过一个特殊情况,就是关机后再开机,docker服务默认没有开机启动,启动docker服务后,使用命令:docker ps -a命令查看有之前启动过的MySQL镜像,然后启动后使用命令:docker exec -it 容器id bash进去环境,使用命令:mysql -uroot -p,输入密码,总是提示错误:ERROR 1045 (28000): Access denied for user ‘root‘@’localhost’ (using password: YES)。后来的解决办法是在需要输入密码的时候没有输入密码,直接按回车键就登录到MySQL里面来了。后来自己没有关机重启,只是把MySQL镜像服务停了,docker服务停了再按上述步骤操作,不输入密码就登陆不进去,输入密码才能登录进去。记录一下和这个奇葩的情况。
  2. 远程登录docker里的MySQL镜像,使用Navicat Premium软件,主机名或IP地址一栏填写docker所在服务器的地址,账号密码端口等填写MySQL镜像使用的,就能直接远程登录进来了,不用再做其他配置

Docker 安装 Tomcat

安装步骤

方法一、docker pull tomcat

查找Docker Hub上的tomcat镜像

1
2
3
4
5
6
7
8
9
[root@localhost ~]# docker search tomcat
NAME DESCRIPTION STARS OFFICIAL AUTOMATED
tomcat Apache Tomcat is an open source implementati… 2455 [OK]
tomee Apache TomEE is an all-Apache Java EE certif… 66 [OK]
dordoka/tomcat Ubuntu 14.04, Oracle JDK 8 and Tomcat 8 base… 53 [OK]
bitnami/tomcat Bitnami Tomcat Docker Image 29 [OK]
kubeguide/tomcat-app Tomcat image for Chapter 1 26
consol/tomcat-7.0 Tomcat 7.0.57, 8080, "admin/admin" 16 [OK]
cloudesire/tomcat Tomcat server, 6/7/8 15 [OK]

这里我们拉取官方的镜像

1
[root@localhost ~]# docker pull tomcat

等待下载完成后,我们就可以在本地镜像列表里查到REPOSITORY为tomcat的镜像。

1
2
[root@localhost ~]# docker images | grep tomcat
tomcat latest 89481b5d9082 2 days ago 506MB

方法二、通过 Dockerfile 构建

首先,创建目录tomcat,用于存放后面的相关东西。

1
[root@localhost ~]# mkdir -p ~/tomcat/webapps ~/tomcat/logs ~/tomcat/conf

命令说明:

  • webapps目录将映射为tomcat容器配置的应用程序目录

  • logs目录将映射为tomcat容器的日志目录

  • conf目录里的配置文件将映射为tomcat容器的配置文件

进入创建的tomcat目录,创建Dockerfile,这个是以Ubuntu系统为参考,CentOS系统使用的话需要修改

1
2
3
4
5
6
7
8
9
10
11
12
13
14
15
16
17
18
19
20
21
22
23
24
25
26
27
28
29
30
31
32
33
34
35
36
37
38
39
40
41
42
43
44
45
46
47
48
49
50
51
52
53
54
55
56
57
58
59
60
61
62
63
64
65
66
67
68
69
70
71
72
73
74
75
76
77
78
79
80
81
82
83
84
85
86
87
88
89
90
91
92
93
94
95
96
97
98
99
100
101
102
103
104
105
106
107
108
109
110
111
112
113
114
115
116
117
118
119
120
121
122
123
124
125
126
127
128
129
130
131
132
133
134
135
136
137
138
139
140
141
142
143
144
145
146
147
148
149
150
151
152
153
154
155
156
157
158
159
160
161
FROM openjdk:8-jre

ENV CATALINA_HOME /usr/local/tomcat
ENV PATH $CATALINA_HOME/bin:$PATH
RUN mkdir -p "$CATALINA_HOME"
WORKDIR $CATALINA_HOME

# let "Tomcat Native" live somewhere isolated
ENV TOMCAT_NATIVE_LIBDIR $CATALINA_HOME/native-jni-lib
ENV LD_LIBRARY_PATH ${LD_LIBRARY_PATH:+$LD_LIBRARY_PATH:}$TOMCAT_NATIVE_LIBDIR

# runtime dependencies for Tomcat Native Libraries
# Tomcat Native 1.2+ requires a newer version of OpenSSL than debian:jessie has available
# > checking OpenSSL library version >= 1.0.2...
# > configure: error: Your version of OpenSSL is not compatible with this version of tcnative
# see http://tomcat.10.x6.nabble.com/VOTE-Release-Apache-Tomcat-8-0-32-tp5046007p5046024.html (and following discussion)
# and https://github.com/docker-library/tomcat/pull/31
ENV OPENSSL_VERSION 1.1.0f-3+deb9u2
RUN set -ex; \
currentVersion="$(dpkg-query --show --showformat '${Version}\n' openssl)"; \
if dpkg --compare-versions "$currentVersion" '<<' "$OPENSSL_VERSION"; then \
if ! grep -q stretch /etc/apt/sources.list; then \
# only add stretch if we're not already building from within stretch
{ \
echo 'deb http://deb.debian.org/debian stretch main'; \
echo 'deb http://security.debian.org stretch/updates main'; \
echo 'deb http://deb.debian.org/debian stretch-updates main'; \
} > /etc/apt/sources.list.d/stretch.list; \
{ \
# add a negative "Pin-Priority" so that we never ever get packages from stretch unless we explicitly request them
echo 'Package: *'; \
echo 'Pin: release n=stretch*'; \
echo 'Pin-Priority: -10'; \
echo; \
# ... except OpenSSL, which is the reason we're here
echo 'Package: openssl libssl*'; \
echo "Pin: version $OPENSSL_VERSION"; \
echo 'Pin-Priority: 990'; \
} > /etc/apt/preferences.d/stretch-openssl; \
fi; \
apt-get update; \
apt-get install -y --no-install-recommends openssl="$OPENSSL_VERSION"; \
rm -rf /var/lib/apt/lists/*; \
fi

RUN apt-get update && apt-get install -y --no-install-recommends \
libapr1 \
&& rm -rf /var/lib/apt/lists/*

# see https://www.apache.org/dist/tomcat/tomcat-$TOMCAT_MAJOR/KEYS
# see also "update.sh" (https://github.com/docker-library/tomcat/blob/master/update.sh)
ENV GPG_KEYS 05AB33110949707C93A279E3D3EFE6B686867BA6 07E48665A34DCAFAE522E5E6266191C37C037D42 47309207D818FFD8DCD3F83F1931D684307A10A5 541FBE7D8F78B25E055DDEE13C370389288584E7 61B832AC2F1C5A90F0F9B00A1C506407564C17A3 713DA88BE50911535FE716F5208B0AB1D63011C7 79F7026C690BAA50B92CD8B66A3AD3F4F22C4FED 9BA44C2621385CB966EBA586F72C284D731FABEE A27677289986DB50844682F8ACB77FC2E86E29AC A9C5DF4D22E99998D9875A5110C01C5A2F6059E7 DCFD35E0BF8CA7344752DE8B6FB21E8933C60243 F3A04C595DB5B6A5F1ECA43E3B7BBB100D811BBE F7DA48BB64BCB84ECBA7EE6935CD23C10D498E23

ENV TOMCAT_MAJOR 8
ENV TOMCAT_VERSION 8.5.32
ENV TOMCAT_SHA512 fc010f4643cb9996cad3812594190564d0a30be717f659110211414faf8063c61fad1f18134154084ad3ddfbbbdb352fa6686a28fbb6402d3207d4e0a88fa9ce

ENV TOMCAT_TGZ_URLS \
# https://issues.apache.org/jira/browse/INFRA-8753?focusedCommentId=14735394#comment-14735394
https://www.apache.org/dyn/closer.cgi?action=download&filename=tomcat/tomcat-$TOMCAT_MAJOR/v$TOMCAT_VERSION/bin/apache-tomcat-$TOMCAT_VERSION.tar.gz \
# if the version is outdated, we might have to pull from the dist/archive :/
https://www-us.apache.org/dist/tomcat/tomcat-$TOMCAT_MAJOR/v$TOMCAT_VERSION/bin/apache-tomcat-$TOMCAT_VERSION.tar.gz \
https://www.apache.org/dist/tomcat/tomcat-$TOMCAT_MAJOR/v$TOMCAT_VERSION/bin/apache-tomcat-$TOMCAT_VERSION.tar.gz \
https://archive.apache.org/dist/tomcat/tomcat-$TOMCAT_MAJOR/v$TOMCAT_VERSION/bin/apache-tomcat-$TOMCAT_VERSION.tar.gz

ENV TOMCAT_ASC_URLS \
https://www.apache.org/dyn/closer.cgi?action=download&filename=tomcat/tomcat-$TOMCAT_MAJOR/v$TOMCAT_VERSION/bin/apache-tomcat-$TOMCAT_VERSION.tar.gz.asc \
# not all the mirrors actually carry the .asc files :'(
https://www-us.apache.org/dist/tomcat/tomcat-$TOMCAT_MAJOR/v$TOMCAT_VERSION/bin/apache-tomcat-$TOMCAT_VERSION.tar.gz.asc \
https://www.apache.org/dist/tomcat/tomcat-$TOMCAT_MAJOR/v$TOMCAT_VERSION/bin/apache-tomcat-$TOMCAT_VERSION.tar.gz.asc \
https://archive.apache.org/dist/tomcat/tomcat-$TOMCAT_MAJOR/v$TOMCAT_VERSION/bin/apache-tomcat-$TOMCAT_VERSION.tar.gz.asc

RUN set -eux; \
\
savedAptMark="$(apt-mark showmanual)"; \
apt-get update; \
\
apt-get install -y --no-install-recommends gnupg dirmngr; \
\
export GNUPGHOME="$(mktemp -d)"; \
for key in $GPG_KEYS; do \
gpg --keyserver ha.pool.sks-keyservers.net --recv-keys "$key"; \
done; \
\
apt-get install -y --no-install-recommends wget ca-certificates; \
\
success=; \
for url in $TOMCAT_TGZ_URLS; do \
if wget -O tomcat.tar.gz "$url"; then \
success=1; \
break; \
fi; \
done; \
[ -n "$success" ]; \
\
echo "$TOMCAT_SHA512 *tomcat.tar.gz" | sha512sum -c -; \
\
success=; \
for url in $TOMCAT_ASC_URLS; do \
if wget -O tomcat.tar.gz.asc "$url"; then \
success=1; \
break; \
fi; \
done; \
[ -n "$success" ]; \
\
gpg --batch --verify tomcat.tar.gz.asc tomcat.tar.gz; \
tar -xvf tomcat.tar.gz --strip-components=1; \
rm bin/*.bat; \
rm tomcat.tar.gz*; \
rm -rf "$GNUPGHOME"; \
\
nativeBuildDir="$(mktemp -d)"; \
tar -xvf bin/tomcat-native.tar.gz -C "$nativeBuildDir" --strip-components=1; \
apt-get install -y --no-install-recommends \
dpkg-dev \
gcc \
libapr1-dev \
libssl-dev \
make \
"openjdk-${JAVA_VERSION%%[.~bu-]*}-jdk=$JAVA_DEBIAN_VERSION" \
; \
( \
export CATALINA_HOME="$PWD"; \
cd "$nativeBuildDir/native"; \
gnuArch="$(dpkg-architecture --query DEB_BUILD_GNU_TYPE)"; \
./configure \
--build="$gnuArch" \
--libdir="$TOMCAT_NATIVE_LIBDIR" \
--prefix="$CATALINA_HOME" \
--with-apr="$(which apr-1-config)" \
--with-java-home="$(docker-java-home)" \
--with-ssl=yes; \
make -j "$(nproc)"; \
make install; \
); \
rm -rf "$nativeBuildDir"; \
rm bin/tomcat-native.tar.gz; \
\
# reset apt-mark's "manual" list so that "purge --auto-remove" will remove all build dependencies
apt-mark auto '.*' > /dev/null; \
[ -z "$savedAptMark" ] || apt-mark manual $savedAptMark; \
apt-get purge -y --auto-remove -o APT::AutoRemove::RecommendsImportant=false; \
rm -rf /var/lib/apt/lists/*; \
\
# sh removes env vars it doesn't support (ones with periods)
# https://github.com/docker-library/tomcat/issues/77
find ./bin/ -name '*.sh' -exec sed -ri 's|^#!/bin/sh$|#!/usr/bin/env bash|' '{}' +

# verify Tomcat Native is working properly
RUN set -e \
&& nativeLines="$(catalina.sh configtest 2>&1)" \
&& nativeLines="$(echo "$nativeLines" | grep 'Apache Tomcat Native')" \
&& nativeLines="$(echo "$nativeLines" | sort -u)" \
&& if ! echo "$nativeLines" | grep 'INFO: Loaded APR based Apache Tomcat Native library' >&2; then \
echo >&2 "$nativeLines"; \
exit 1; \
fi

EXPOSE 8080
CMD ["catalina.sh", "run"]

通过Dockerfile创建一个镜像,替换成你自己的名字

1
[root@localhost ~]# docker build -t tomcat .

创建完成后,我们可以在本地的镜像列表里查找到刚刚创建的镜像

1
2
[root@localhost ~]# docker images|grep tomcat
tomcat latest 70f819d3d2d9 7 days ago 335.8 MB

使用tomcat镜像

运行容器

1
2
[root@localhost home]# docker run --name test_docker_tomcat -p 8080:8080 -v $PWD/test:/usr/local/tomcat/webapps/test -d tomcat
3bdf4b155aaef20bac44511f84b402a2cb6d6957bc284c21a51e89fcbc2081a6

命令说明:

  • -p 8080:8080:将容器的8080端口映射到主机的8080端口
  • -v $PWD/test:/usr/local/tomcat/webapps/test:将主机中当前目录下的test挂载到容器的/test

查看容器启动情况

1
2
3
[root@localhost home]# docker ps
CONTAINER ID IMAGE COMMAND CREATED STATUS PORTS NAMES
3bdf4b155aae tomcat "catalina.sh run" 21 seconds ago Up 20 seconds 0.0.0.0:8080->8080/tcp test_docker_tomcat

通过浏览器访问

浏览器地址看输入:http://ip:8080

Docker 安装 Python

安装步骤

方法一、docker pull python:3.5

查找Docker Hub上的python镜像

1
2
3
4
5
6
[root@localhost ~]# docker search python
NAME DESCRIPTION STARS OFFICIAL AUTOMATED
python Python is an interpreted,... 982 [OK]
kaggle/python Docker image for Python... 33 [OK]
azukiapp/python Docker image to run Python ... 3 [OK]
vimagick/python mini python 2 [OK]

这里我们拉取官方的镜像,标签为3.5

1
[root@localhost ~]# docker pull python:3.5

等待下载完成后,我们就可以在本地镜像列表里查到REPOSITORY为python,标签为3.5的镜像。

1
2
3
[root@localhost ~]# docker images python:3.5 
REPOSITORY TAG IMAGE ID CREATED SIZE
python 3.5 045767ddf24a 9 days ago 684.1 MB

方法二、通过 Dockerfile 构建

首先,创建目录python,用于存放后面的相关东西。

1
[root@localhost ~]# mkdir -p ~/python ~/python/myapp

myapp目录将映射为python容器配置的应用目录

进入创建的python目录,创建Dockerfile,这个是以Ubuntu系统为参考,CentOS系统使用的话需要修改

1
2
3
4
5
6
7
8
9
10
11
12
13
14
15
16
17
18
19
20
21
22
23
24
25
26
27
28
29
30
31
32
33
34
35
36
37
38
39
40
41
42
43
44
45
46
47
48
49
50
51
FROM buildpack-deps:jessie

# remove several traces of debian python
RUN apt-get purge -y python.*

# http://bugs.python.org/issue19846
# > At the moment, setting "LANG=C" on a Linux system *fundamentally breaks Python 3*, and that's not OK.
ENV LANG C.UTF-8

# gpg: key F73C700D: public key "Larry Hastings <larry@hastings.org>" imported
ENV GPG_KEY 97FC712E4C024BBEA48A61ED3A5CA953F73C700D

ENV PYTHON_VERSION 3.5.1

# if this is called "PIP_VERSION", pip explodes with "ValueError: invalid truth value '<VERSION>'"
ENV PYTHON_PIP_VERSION 8.1.2

RUN set -ex \
&& curl -fSL "https://www.python.org/ftp/python/${PYTHON_VERSION%%[a-z]*}/Python-$PYTHON_VERSION.tar.xz" -o python.tar.xz \
&& curl -fSL "https://www.python.org/ftp/python/${PYTHON_VERSION%%[a-z]*}/Python-$PYTHON_VERSION.tar.xz.asc" -o python.tar.xz.asc \
&& export GNUPGHOME="$(mktemp -d)" \
&& gpg --keyserver ha.pool.sks-keyservers.net --recv-keys "$GPG_KEY" \
&& gpg --batch --verify python.tar.xz.asc python.tar.xz \
&& rm -r "$GNUPGHOME" python.tar.xz.asc \
&& mkdir -p /usr/src/python \
&& tar -xJC /usr/src/python --strip-components=1 -f python.tar.xz \
&& rm python.tar.xz \
\
&& cd /usr/src/python \
&& ./configure --enable-shared --enable-unicode=ucs4 \
&& make -j$(nproc) \
&& make install \
&& ldconfig \
&& pip3 install --no-cache-dir --upgrade --ignore-installed pip==$PYTHON_PIP_VERSION \
&& find /usr/local -depth \
\( \
\( -type d -a -name test -o -name tests \) \
-o \
\( -type f -a -name '*.pyc' -o -name '*.pyo' \) \
\) -exec rm -rf '{}' + \
&& rm -rf /usr/src/python ~/.cache

# make some useful symlinks that are expected to exist
RUN cd /usr/local/bin \
&& ln -s easy_install-3.5 easy_install \
&& ln -s idle3 idle \
&& ln -s pydoc3 pydoc \
&& ln -s python3 python \
&& ln -s python3-config python-config

CMD ["python3"]

通过Dockerfile创建一个镜像,替换成你自己的名字

1
[root@localhost ~]# docker build -t python:3.5 .

创建完成后,我们可以在本地的镜像列表里查找到刚刚创建的镜像

1
2
3
[root@localhost ~]# docker images python:3.5 
REPOSITORY TAG IMAGE ID CREATED SIZE
python 3.5 045767ddf24a 9 days ago 684.1 MB

使用python镜像

在/home/python/myapp目录下创建一个 helloworld.py 文件,代码如下:

1
2
#!/usr/bin/python
print("Hello, World!");

运行容器

1
[root@localhost ~]# docker run  -v /home/python/myapp:/usr/src/myapp  -w /usr/src/myapp python:3.5 python helloworld.py

命令说明:

  • -v /home/python/myapp:/usr/src/myapp :将主机指定目录下的myapp挂载到容器的/usr/src/myapp
  • -w /usr/src/myapp :指定容器的/usr/src/myapp目录为工作目录
  • python helloworld.py :使用容器的python命令来执行工作目录中的helloworld.py文件

输出结果:

1
Hello, World!

Docker 安装 Redis

安装步骤

方法一、docker pull redis:5.0

查找Docker Hub上的redis镜像

1
2
3
4
5
6
7
8
[root@localhost ~]# docker search  redis
NAME DESCRIPTION STARS OFFICIAL AUTOMATED
redis Redis is an open source ... 2321 [OK]
sameersbn/redis 32 [OK]
torusware/speedus-redis Always updated official ... 29 [OK]
bitnami/redis Bitnami Redis Docker Image 22 [OK]
anapsix/redis 11MB Redis server image ... 6 [OK]
...

这里我们拉取官方的镜像,标签为5.0

1
[root@localhost ~]# docker pull  redis:5.0

等待下载完成后,我们就可以在本地镜像列表里查到REPOSITORY为redis,标签为5.0的镜像。

1
2
3
[root@localhost ~]# docker images redis
REPOSITORY TAG IMAGE ID CREATED SIZE
redis 5.0 598a6f110d01 3 days ago 118MB

方法二、通过 Dockerfile 构建

首先,创建目录redis,用于存放后面的相关东西。

1
[root@localhost ~]# mkdir -p ~/redis ~/redis/data
  • data目录将映射为redis容器配置的/data目录,作为redis数据持久化的存储目录

进入创建的redis目录,创建Dockerfile,这个是以Ubuntu系统为参考,CentOS系统使用的话需要修改

1
2
3
4
5
6
7
8
9
10
11
12
13
14
15
16
17
18
19
20
21
22
23
24
25
26
27
28
29
30
31
32
33
34
35
36
37
38
39
40
41
42
43
44
45
46
47
48
49
50
FROM debian:jessie

# add our user and group first to make sure their IDs get assigned consistently, regardless of whatever dependencies get added
RUN groupadd -r redis && useradd -r -g redis redis

RUN apt-get update && apt-get install -y --no-install-recommends \
ca-certificates \
wget \
&& rm -rf /var/lib/apt/lists/*

# grab gosu for easy step-down from root
ENV GOSU_VERSION 1.7
RUN set -x \
&& wget -O /usr/local/bin/gosu "https://github.com/tianon/gosu/releases/download/$GOSU_VERSION/gosu-$(dpkg --print-architecture)" \
&& wget -O /usr/local/bin/gosu.asc "https://github.com/tianon/gosu/releases/download/$GOSU_VERSION/gosu-$(dpkg --print-architecture).asc" \
&& export GNUPGHOME="$(mktemp -d)" \
&& gpg --keyserver ha.pool.sks-keyservers.net --recv-keys B42F6819007F00F88E364FD4036A9C25BF357DD4 \
&& gpg --batch --verify /usr/local/bin/gosu.asc /usr/local/bin/gosu \
&& rm -r "$GNUPGHOME" /usr/local/bin/gosu.asc \
&& chmod +x /usr/local/bin/gosu \
&& gosu nobody true

ENV REDIS_VERSION 5.0.0
ENV REDIS_DOWNLOAD_URL http://download.redis.io/releases/redis-5.0.0.tar.gz
ENV REDIS_DOWNLOAD_SHA1 0c1820931094369c8cc19fc1be62f598bc5961ca

# for redis-sentinel see: http://redis.io/topics/sentinel
RUN buildDeps='gcc libc6-dev make' \
&& set -x \
&& apt-get update && apt-get install -y $buildDeps --no-install-recommends \
&& rm -rf /var/lib/apt/lists/* \
&& wget -O redis.tar.gz "$REDIS_DOWNLOAD_URL" \
&& echo "$REDIS_DOWNLOAD_SHA1 *redis.tar.gz" | sha1sum -c - \
&& mkdir -p /usr/src/redis \
&& tar -xzf redis.tar.gz -C /usr/src/redis --strip-components=1 \
&& rm redis.tar.gz \
&& make -C /usr/src/redis \
&& make -C /usr/src/redis install \
&& rm -r /usr/src/redis \
&& apt-get purge -y --auto-remove $buildDeps

RUN mkdir /data && chown redis:redis /data
VOLUME /data
WORKDIR /data

COPY docker-entrypoint.sh /usr/local/bin/
ENTRYPOINT ["docker-entrypoint.sh"]

EXPOSE 6379
CMD [ "redis-server" ]

通过Dockerfile创建一个镜像,替换成你自己的名字

1
[root@localhost ~]# docker build  -t redis:5.0 .

创建完成后,我们可以在本地的镜像列表里查找到刚刚创建的镜像

1
2
3
[root@localhost ~]# docker images redis 
REPOSITORY TAG IMAGE ID CREATED SIZE
redis 5.0 43c923d57784 2 weeks ago 193.9 MB

使用redis镜像

运行容器

1
2
[root@localhost home]# docker run -p 6379:6379 -v $PWD/data:/data  -d redis:5.0 redis-server --appendonly yes
2c4e3bfd9691e9174cebba01ebc55f464321749156eb462fd099da3544a0c67b

命令说明:

  • -p 6379:6379 : 将容器的6379端口映射到主机的6379端口
  • -v $PWD/data:/data : 将主机中当前目录下的data挂载到容器的/data
  • redis-server –appendonly yes : 在容器执行redis-server启动命令,并打开redis持久化配置

查看容器启动情况

1
2
3
[root@localhost ~]# docker ps
CONTAINER ID IMAGE COMMAND ... PORTS NAMES
43f7a65ec7f8 redis:3.2 "docker-entrypoint.sh" ... 0.0.0.0:6379->6379/tcp agitated_cray

连接、查看容器

使用redis镜像执行redis-cli命令连接到刚启动的容器,主机IP为127.0.0.1

1
2
3
4
5
6
7
8
9
10
11
12
13
[root@localhost home]# docker exec -it 2c4e3bfd9691 redis-cli
127.0.0.1:6379> info
# Server
redis_version:5.0.5
redis_git_sha1:00000000
redis_git_dirty:0
redis_build_id:f5cc35eb8e511133
redis_mode:standalone
os:Linux 3.10.0-862.el7.x86_64 x86_64
arch_bits:64
multiplexing_api:epoll
...
127.0.0.1:6379> quit

Docker 安装 MongoDB

安装步骤

方法一、docker pull mongo

查找Docker Hub上的mongo镜像

1
2
3
4
5
6
7
[root@localhost ~]# docker search mongo
NAME DESCRIPTION STARS OFFICIAL AUTOMATED
mongo MongoDB document databases ... 1989 [OK]
mongo-express Web-based MongoDB admin int... 22 [OK]
mvertes/alpine-mongo light MongoDB container 19 [OK]
mongooseim/mongooseim-docker MongooseIM server the lates... 9 [OK]
......

这里我们拉取官方的镜像,标签为4.1

1
[root@localhost ~]# docker pull mongo:4.1

等待下载完成后,我们就可以在本地镜像列表里查到REPOSITORY为mongo,标签为4.1的镜像。

1
2
3
[root@localhost home]# docker images mongo
REPOSITORY TAG IMAGE ID CREATED SIZE
mongo 4.1 6e89620d0711 11 days ago 360MB

方法二、通过 Dockerfile 构建

首先,创建目录mongo,用于存放后面的相关东西。

1
[root@localhost ~]# mkdir -p ~/mongo  ~/mongo/db
  • db目录将映射为mongo容器配置的/data/db目录,作为mongo数据的存储目录

进入创建的mongo目录,创建Dockerfile,这个是以Ubuntu系统为参考,CentOS系统使用的话需要修改

1
2
3
4
5
6
7
8
9
10
11
12
13
14
15
16
17
18
19
20
21
22
23
24
25
26
27
28
29
30
31
32
33
34
35
36
37
38
39
40
41
42
43
44
45
46
47
48
49
50
51
52
53
54
55
56
57
58
59
60
61
62
63
64
65
66
67
68
69
70
71
72
73
74
75
76
77
78
79
80
81
82
83
84
85
86
87
88
89
90
91
92
93
94
95
96
97
98
FROM debian:jessie-slim

# add our user and group first to make sure their IDs get assigned consistently, regardless of whatever dependencies get added
RUN groupadd -r mongodb && useradd -r -g mongodb mongodb

RUN apt-get update \
&& apt-get install -y --no-install-recommends \
ca-certificates \
jq \
numactl \
&& rm -rf /var/lib/apt/lists/*

# grab gosu for easy step-down from root (https://github.com/tianon/gosu/releases)
ENV GOSU_VERSION 1.10
# grab "js-yaml" for parsing mongod's YAML config files (https://github.com/nodeca/js-yaml/releases)
ENV JSYAML_VERSION 3.10.0

RUN set -ex; \
\
apt-get update; \
apt-get install -y --no-install-recommends \
wget \
; \
rm -rf /var/lib/apt/lists/*; \
\
dpkgArch="$(dpkg --print-architecture | awk -F- '{ print $NF }')"; \
wget -O /usr/local/bin/gosu "https://github.com/tianon/gosu/releases/download/$GOSU_VERSION/gosu-$dpkgArch"; \
wget -O /usr/local/bin/gosu.asc "https://github.com/tianon/gosu/releases/download/$GOSU_VERSION/gosu-$dpkgArch.asc"; \
export GNUPGHOME="$(mktemp -d)"; \
gpg --keyserver ha.pool.sks-keyservers.net --recv-keys B42F6819007F00F88E364FD4036A9C25BF357DD4; \
gpg --batch --verify /usr/local/bin/gosu.asc /usr/local/bin/gosu; \
command -v gpgconf && gpgconf --kill all || :; \
rm -r "$GNUPGHOME" /usr/local/bin/gosu.asc; \
chmod +x /usr/local/bin/gosu; \
gosu nobody true; \
\
wget -O /js-yaml.js "https://github.com/nodeca/js-yaml/raw/${JSYAML_VERSION}/dist/js-yaml.js"; \
# TODO some sort of download verification here
\
apt-get purge -y --auto-remove wget

RUN mkdir /docker-entrypoint-initdb.d

ENV GPG_KEYS \
# pub 4096R/AAB2461C 2014-02-25 [expires: 2016-02-25]
# Key fingerprint = DFFA 3DCF 326E 302C 4787 673A 01C4 E7FA AAB2 461C
# uid MongoDB 2.6 Release Signing Key <packaging@mongodb.com>
DFFA3DCF326E302C4787673A01C4E7FAAAB2461C \
# pub 4096R/EA312927 2015-10-09 [expires: 2017-10-08]
# Key fingerprint = 42F3 E95A 2C4F 0827 9C49 60AD D68F A50F EA31 2927
# uid MongoDB 3.2 Release Signing Key <packaging@mongodb.com>
42F3E95A2C4F08279C4960ADD68FA50FEA312927
# https://docs.mongodb.com/manual/tutorial/verify-mongodb-packages/#download-then-import-the-key-file
RUN set -ex; \
export GNUPGHOME="$(mktemp -d)"; \
for key in $GPG_KEYS; do \
gpg --keyserver ha.pool.sks-keyservers.net --recv-keys "$key"; \
done; \
gpg --export $GPG_KEYS > /etc/apt/trusted.gpg.d/mongodb.gpg; \
command -v gpgconf && gpgconf --kill all || :; \
rm -r "$GNUPGHOME"; \
apt-key list

# Allow build-time overrides (eg. to build image with MongoDB Enterprise version)
# Options for MONGO_PACKAGE: mongodb-org OR mongodb-enterprise
# Options for MONGO_REPO: repo.mongodb.org OR repo.mongodb.com
# Example: docker build --build-arg MONGO_PACKAGE=mongodb-enterprise --build-arg MONGO_REPO=repo.mongodb.com .
ARG MONGO_PACKAGE=mongodb-org
ARG MONGO_REPO=repo.mongodb.org
ENV MONGO_PACKAGE=${MONGO_PACKAGE} MONGO_REPO=${MONGO_REPO}

ENV MONGO_MAJOR 3.2
ENV MONGO_VERSION 3.2.20

RUN echo "deb http://$MONGO_REPO/apt/debian jessie/${MONGO_PACKAGE%-unstable}/$MONGO_MAJOR main" | tee "/etc/apt/sources.list.d/${MONGO_PACKAGE%-unstable}.list"

RUN set -x \
&& apt-get update \
&& apt-get install -y \
${MONGO_PACKAGE}=$MONGO_VERSION \
${MONGO_PACKAGE}-server=$MONGO_VERSION \
${MONGO_PACKAGE}-shell=$MONGO_VERSION \
${MONGO_PACKAGE}-mongos=$MONGO_VERSION \
${MONGO_PACKAGE}-tools=$MONGO_VERSION \
&& rm -rf /var/lib/apt/lists/* \
&& rm -rf /var/lib/mongodb \
&& mv /etc/mongod.conf /etc/mongod.conf.orig

RUN mkdir -p /data/db /data/configdb \
&& chown -R mongodb:mongodb /data/db /data/configdb
VOLUME /data/db /data/configdb

COPY docker-entrypoint.sh /usr/local/bin/
RUN ln -s usr/local/bin/docker-entrypoint.sh /entrypoint.sh # backwards compat
ENTRYPOINT ["docker-entrypoint.sh"]

EXPOSE 27017
CMD ["mongod"]

通过Dockerfile创建一个镜像,替换成你自己的名字

1
[root@localhost ~]# docker build -t mongo:3.2 .

创建完成后,我们可以在本地的镜像列表里查找到刚刚创建的镜像

1
2
3
[root@localhost ~]# docker images  mongo:3.2
REPOSITORY TAG IMAGE ID CREATED SIZE
mongo 3.2 282fd552add6 9 days ago 336.1 MB

使用mongo镜像

运行容器

1
2
[root@localhost home]# docker run --name test_docker_mongodb -p 27017:27017  -v $PWD/mongodb/configdb:/data/configdb/ -v $PWD/mongodb/db/:/data/db/ -d mongo:4.1 --auth
4c13b2cef633d1b67b3fb30f2776064eaf110265a9e93a324b62b0780d14cae8

命令说明:

  • -p 27017:27017 : 将容器的27017 端口映射到主机的27017 端口
  • -v $PWD/mongodb/configdb:/data/configdb/ 主机中当前目录下的configdb挂载到容器的/data/configdb,作为mongo数据配置目录
  • -v : $PWD/mongodb/db/:/data/db/ 将主机中当前目录下的db挂载到容器的/data/db,作为mongo数据存储目录

查看容器启动情况

1
2
3
[root@localhost home]# docker ps
CONTAINER ID IMAGE COMMAND CREATED STATUS PORTS NAMES
4c13b2cef633 mongo:4.1 "docker-entrypoint.s…" 3 minutes ago Up 3 minutes 0.0.0.0:27017->27017/tcp test_docker_mongodb

使用mongo镜像执行mongo 命令连接到刚启动的MongoDB容器

1
2
3
4
5
6
7
8
9
10
11
12
13
14
15
16
17
18
19
20
21
22
23
24
25
26
27
28
29
30
31
32
33
34
35
36
37
38
39
40
41
# 以 admin 用户身份进入mongo
[root@localhost home]# docker exec -it 4c13b2cef633 mongo admin
MongoDB shell version v4.1.13
connecting to: mongodb://127.0.0.1:27017/admin?compressors=disabled&gssapiServiceName=mongodb
Implicit session: session { "id" : UUID("0f3d246c-845e-47e3-b571-4f8c0f94028a") }
MongoDB server version: 4.1.13
Welcome to the MongoDB shell.
For interactive help, type "help".
For more comprehensive documentation, see
http://docs.mongodb.org/
Questions? Try the support group
http://groups.google.com/group/mongodb-user

# 创建一个 admin 管理员账号
> db.createUser({ user: 'admin', pwd: '123456', roles: [ { role: "userAdminAnyDatabase", db: "admin" } ] });
Successfully added user: {
"user" : "admin",
"roles" : [
{
"role" : "userAdminAnyDatabase",
"db" : "admin"
}
]
}
# 退出
> exit;


[root@localhost home]# docker exec -it 4c13b2cef633 mongo admin
MongoDB shell version v4.1.13
connecting to: mongodb://127.0.0.1:27017/admin?compressors=disabled&gssapiServiceName=mongodb
Implicit session: session { "id" : UUID("1c6c9ebd-458d-42d3-906d-51fb84b38bf1") }
MongoDB server version: 4.1.13
# 再次登录需要对 admin 进行身份认证
> db.auth("admin","123456");
1

# 切换数据库
> use app;
switched to db app
>

使用 mongo-express 管理mongodb

mongo-express是MongoDB的一个可视化图形管理工具,通过docker来运行一个mongo-express,来管理上面创建的mongodb服务。

1
2
3
4
5
# 需要进行账号验证才能使用
docker pull docker.io/mongo-express
docker run -it --rm -p 8081:8081 --link <mongoDB容器ID>:mongo mongo-express
# 通过浏览器访问
http://<宿主机IP地址>:8081

使用 mongoclient 管理 mongodb

1
2
3
4
5
# 需要进行账号验证才能使用
docker pull mongoclient/mongoclient
docker run --name mongoclient -d -p 3000:3000 -e MONGO_URL=mongodb://<宿主机IP地址>:27017/ mongoclient/mongoclient
# 通过浏览器访问
http://<宿主机IP地址>:3000

Docker 安装 Apache

安装步骤

方法一、docker pull httpd

查找Docker Hub上的httpd镜像

1
2
3
4
5
6
7
8
[root@localhost ~]# # docker search httpd
NAME DESCRIPTION STARS OFFICIAL AUTOMATED
httpd The Apache HTTP Server .. 524 [OK]
centos/httpd 7 [OK]
rgielen/httpd-image-php5 Docker image for Apache... 1 [OK]
microwebapps/httpd-frontend Httpd frontend allowing... 1 [OK]
lolhens/httpd Apache httpd 2 Server 1 [OK]
...

这里我们拉取官方的镜像

1
[root@localhost ~]# docker pull httpd

等待下载完成后,我们就可以在本地镜像列表里查到REPOSITORY为httpd的镜像。

1
2
3
[root@localhost home]# docker images httpd
REPOSITORY TAG IMAGE ID CREATED SIZE
httpd latest ee39f68eb241 2 days ago 154MB

方法二、通过 Dockerfile构建

首先,创建目录apache,用于存放后面的相关东西。

1
[root@localhost ~]# mkdir -p  ~/apache/www ~/apache/logs ~/apache/conf

命令说明:

  • www目录将映射为apache容器配置的应用程序目录
  • logs目录将映射为apache容器的日志目录
  • conf目录里的配置文件将映射为apache容器的配置文件

进入创建的apache目录,创建Dockerfile,这个是以Ubuntu系统为参考,CentOS系统使用的话需要修改

1
2
3
4
5
6
7
8
9
10
11
12
13
14
15
16
17
18
19
20
21
22
23
24
25
26
27
28
29
30
31
32
33
34
35
36
37
38
39
40
41
42
43
44
45
46
47
48
49
50
51
52
53
54
55
56
57
58
59
60
61
62
63
64
65
66
67
68
69
70
71
72
73
74
FROM debian:jessie

# add our user and group first to make sure their IDs get assigned consistently, regardless of whatever dependencies get added
#RUN groupadd -r www-data && useradd -r --create-home -g www-data www-data

ENV HTTPD_PREFIX /usr/local/apache2
ENV PATH $PATH:$HTTPD_PREFIX/bin
RUN mkdir -p "$HTTPD_PREFIX" \
&& chown www-data:www-data "$HTTPD_PREFIX"
WORKDIR $HTTPD_PREFIX

# install httpd runtime dependencies
# https://httpd.apache.org/docs/2.4/install.html#requirements
RUN apt-get update \
&& apt-get install -y --no-install-recommends \
libapr1 \
libaprutil1 \
libaprutil1-ldap \
libapr1-dev \
libaprutil1-dev \
libpcre++0 \
libssl1.0.0 \
&& rm -r /var/lib/apt/lists/*

ENV HTTPD_VERSION 2.4.20
ENV HTTPD_BZ2_URL https://www.apache.org/dist/httpd/httpd-$HTTPD_VERSION.tar.bz2

RUN buildDeps=' \
ca-certificates \
curl \
bzip2 \
gcc \
libpcre++-dev \
libssl-dev \
make \
' \
set -x \
&& apt-get update \
&& apt-get install -y --no-install-recommends $buildDeps \
&& rm -r /var/lib/apt/lists/* \
\
&& curl -fSL "$HTTPD_BZ2_URL" -o httpd.tar.bz2 \
&& curl -fSL "$HTTPD_BZ2_URL.asc" -o httpd.tar.bz2.asc \
# see https://httpd.apache.org/download.cgi#verify
&& export GNUPGHOME="$(mktemp -d)" \
&& gpg --keyserver ha.pool.sks-keyservers.net --recv-keys A93D62ECC3C8EA12DB220EC934EA76E6791485A8 \
&& gpg --batch --verify httpd.tar.bz2.asc httpd.tar.bz2 \
&& rm -r "$GNUPGHOME" httpd.tar.bz2.asc \
\
&& mkdir -p src \
&& tar -xvf httpd.tar.bz2 -C src --strip-components=1 \
&& rm httpd.tar.bz2 \
&& cd src \
\
&& ./configure \
--prefix="$HTTPD_PREFIX" \
--enable-mods-shared=reallyall \
&& make -j"$(nproc)" \
&& make install \
\
&& cd .. \
&& rm -r src \
\
&& sed -ri \
-e 's!^(\s*CustomLog)\s+\S+!\1 /proc/self/fd/1!g' \
-e 's!^(\s*ErrorLog)\s+\S+!\1 /proc/self/fd/2!g' \
"$HTTPD_PREFIX/conf/httpd.conf" \
\
&& apt-get purge -y --auto-remove $buildDeps

COPY httpd-foreground /usr/local/bin/

EXPOSE 80
CMD ["httpd-foreground"]

Dockerfile文件中 COPY httpd-foreground /usr/local/bin/ 是将当前目录下的httpd-foreground拷贝到镜像里,作为httpd服务的启动脚本,所以我们要在本地创建一个脚本文件httpd-foreground

1
2
3
4
5
6
7
#!/bin/bash
set -e

# Apache gets grumpy about PID files pre-existing
rm -f /usr/local/apache2/logs/httpd.pid

exec httpd -DFOREGROUND

赋予httpd-foreground文件可执行权限

1
[root@localhost ~]# chmod +x httpd-foreground

通过Dockerfile创建一个镜像,替换成你自己的名字

1
[root@localhost ~]# docker build -t httpd .

创建完成后,我们可以在本地的镜像列表里查找到刚刚创建的镜像

1
2
3
[root@localhost ~]# docker images httpd
REPOSITORY TAG IMAGE ID CREATED SIZE
httpd latest da1536b4ef14 23 seconds ago 195.1 MB

使用apache镜像

运行容器

1
2
3
4
5
6
7
8
# 运行后使用docker ps查看,发现没有启动,也就是说这个命令有问题
[root@localhost ~]# docker run -p 80:80 -v $PWD/www/:/usr/local/apache2/htdocs/ -v $PWD/conf/httpd.conf:/usr/local/apache2/conf/httpd.conf -v $PWD/logs/:/usr/local/apache2/logs/ -d httpd


## 使用这个命令可以启动
[root@localhost ~]# docker run -it -d -p 80:80 --name test_docker_httpd -v /home/apache/:/usr/local/apache2/htdocs/ httpd

# 在/home/apache/目录下新建一个index.html文件,使用浏览器访问测试

命令说明:

  • -p 80:80 :将容器的80端口映射到主机的80端口

  • -v $PWD/www/:/usr/local/apache2/htdocs/ :将主机中当前目录下的www目录挂载到容器的/usr/local/apache2/htdocs/

  • -v $PWD/conf/httpd.conf:/usr/local/apache2/conf/httpd.conf :将主机中当前目录下的conf/httpd.conf文件挂载到容器的/usr/local/apache2/conf/httpd.conf

  • -v $PWD/logs/:/usr/local/apache2/logs/ :将主机中当前目录下的logs目录挂载到容器的/usr/local/apache2/logs/

查看容器启动情况

1
2
3
[root@localhost ~]# docker ps
CONTAINER ID IMAGE COMMAND ... PORTS NAMES
79a97f2aac37 httpd "httpd-foreground" ... 0.0.0.0:80->80/tcp sharp_swanson

通过浏览器访问,出现的内容是index.html的内容

但是有个问题,配置文件这个要弄,估计还得从启动httpd的命令处着手,就跟nginx容器启动类似

MacOS系统配置Nginx+php+mysql的docker使用环境

  1. 创建目录
1
mkdir -p /Users/sui/docker/nginx/conf.d && mkdir /Users/sui/www &&  cd /Users/sui/docker/nginx/conf.d && sudo touch default.conf
  1. 启动php-fpm
1
2
3
docker run --name sui-php -d -v /Users/sui/www:/var/www/html:ro php:7.1-fpm
# --name sui-php 是容器的名字
# /Users/sui/www 是本地 php 文件的存储目录,/var/www/html 是容器内 php 文件的存储目录,ro 表示只读
  1. 编辑 nginx 配置文件

配置文件位置:/Users/sui/docker/nginx/conf.d/default.conf。

1
2
3
4
5
6
7
8
9
10
11
12
13
14
15
16
17
18
19
20
21
22
23
server {
listen 80;
server_name localhost;

location / {
root /usr/share/nginx/html;
index index.html index.htm;
}

error_page 500 502 503 504 /50x.html;
location = /50x.html {
root /usr/share/nginx/html;
}

location ~ \.php$ {
fastcgi_pass php:9000;
fastcgi_index index.php;
fastcgi_param SCRIPT_FILENAME /var/www/html/$fastcgi_script_name;
include fastcgi_params;
}
}
# php:9000 表示 php-fpm 服务的访问路径
# /var/www/html 是 sui-php 中 php 文件的存储路径,经 docker 映射,变成本地路径 /Users/sui/www
  1. 启动 nginx
1
2
3
4
5
6
docker run --name sui-nginx -p 80:80 -d -v /Users/sui/www:/usr/share/nginx/html:ro \
-v /Users/sui/docker/nginx/conf.d:/etc/nginx/conf.d:ro --link sui-php:php nginx
# -p 80:80 用于添加端口映射,把 sui-nginx 中的 80 端口暴露出来
# /Users/sui/www 是本地html文件的存储目录,/usr/share/nginx/html是容器内html文件的存储目录
# /Users/sui/docker/nginx/conf.d 是本地nginx虚拟主机配置路径,/etc/nginx/conf.d是nginx容器内虚拟主机配置路径(重要)
# --link sui-php:php 把sui-php的网络并入sui-nginx,并通过修改 sui-nginx 的 /etc/hosts,把域名 php 映射成 127.0.0.1,让 nginx 通过 php:9000 访问 php-fpm(这一步至关重要)
  1. 测试结果
    在 /Users/sui/www 下放两个文件:index.html index.php

  2. mysql 服务器

1
2
3
4
mkdir -p /Users/sui/docker/mysql/data /Users/sui/docker/mysql/logs /Users/sui/docker/mysql/conf
# data 目录将映射为 mysql 容器配置的数据文件存放路径
# logs 目录将映射为 mysql 容器的日志目录
# conf 目录里的配置文件将映射为 mysql 容器的配置文件
1
2
# 启动docker里的MySQL镜像
docker run -p 3306:3306 --name sui-mysql -v /Users/sui/docker/mysql/conf:/etc/mysql -v /Users/sui/docker/mysql/logs:/logs -v /Users/sui/docker/mysql/data:/mysql_data -e MYSQL_ROOT_PASSWORD=123456 -d --link sui-php mysql
  1. 进入mysql客户端
1
docker run -it --link sui-mysql:mysql --rm mysql sh -c 'exec mysql -h"$MYSQL_PORT_3306_TCP_ADDR" -P"$MYSQL_PORT_3306_TCP_PORT" -uroot -p"$MYSQL_ENV_MYSQL_ROOT_PASSWORD"'
  1. phpmyadmin
1
docker run --name sui-myadmin -d --link sui-mysql:db -p 8080:80 phpmyadmin/phpmyadmin
  1. 要点

若某个镜像中需要使用到另一个镜像中的资源,则需要使用-–link进行关联,比如:nginx关联php,php关联mysql等。

Docker 命令大全

容器生命周期管理

run

1
2
3
4
5
6
7
8
9
10
11
12
13
14
15
16
17
18
19
20
21
22
23
24
25
26
27
28
29
30
31
32
33
34
35
36
37
38
39
40
41
42
43
44
45
46
47
48
49
50
51
52
53
54
55
56
57
58
59
60
61
62
63
64
65
docker run :创建一个新的容器并运行一个命令
语法

docker run [OPTIONS] IMAGE [COMMAND] [ARG...]

OPTIONS说明:

-a stdin: 指定标准输入输出内容类型,可选 STDIN/STDOUT/STDERR 三项;

-d: 后台运行容器,并返回容器ID;

-i: 以交互模式运行容器,通常与 -t 同时使用;

-P: 随机端口映射,容器内部端口随机映射到主机的高端口

-p: 指定端口映射,格式为:主机(宿主)端口:容器端口

-t: 为容器重新分配一个伪输入终端,通常与 -i 同时使用;

--name="nginx-lb": 为容器指定一个名称;

--dns 8.8.8.8: 指定容器使用的DNS服务器,默认和宿主一致;

--dns-search example.com: 指定容器DNS搜索域名,默认和宿主一致;

-h "mars": 指定容器的hostname;

-e username="ritchie": 设置环境变量;

--env-file=[]: 从指定文件读入环境变量;

--cpuset="0-2" or --cpuset="0,1,2": 绑定容器到指定CPU运行;

-m :设置容器使用内存最大值;

--net="bridge": 指定容器的网络连接类型,支持 bridge/host/none/container: 四种类型;

--link=[]: 添加链接到另一个容器;

--expose=[]: 开放一个端口或一组端口;

--volume , -v: 绑定一个卷

实例

使用docker镜像nginx:latest以后台模式启动一个容器,并将容器命名为mynginx。

docker run --name mynginx -d nginx:latest

使用镜像nginx:latest以后台模式启动一个容器,并将容器的80端口映射到主机随机端口。

docker run -P -d nginx:latest

使用镜像 nginx:latest,以后台模式启动一个容器,将容器的 80 端口映射到主机的 80 端口,主机的目录 /data 映射到容器的 /data。

docker run -p 80:80 -v /data:/data -d nginx:latest

绑定容器的 8080 端口,并将其映射到本地主机 127.0.0.1 的 80 端口上。

$ docker run -p 127.0.0.1:80:8080/tcp ubuntu bash

使用镜像nginx:latest以交互模式启动一个容器,在容器内执行/bin/bash命令。

runoob@runoob:~$ docker run -it nginx:latest /bin/bash
root@b8573233d675:/#

start/stop/restart

1
2
3
4
5
6
7
8
9
10
11
12
13
14
15
16
17
18
19
20
21
22
23
24
25
26
docker start :启动一个或多个已经被停止的容器

docker stop :停止一个运行中的容器

docker restart :重启容器
语法

docker start [OPTIONS] CONTAINER [CONTAINER...]

docker stop [OPTIONS] CONTAINER [CONTAINER...]

docker restart [OPTIONS] CONTAINER [CONTAINER...]

实例

启动已被停止的容器myrunoob

docker start myrunoob

停止运行中的容器myrunoob

docker stop myrunoob

重启容器myrunoob

docker restart myrunoob

kill

1
2
3
4
5
6
7
8
9
10
11
12
13
14
15
docker kill :杀掉一个运行中的容器。
语法

docker kill [OPTIONS] CONTAINER [CONTAINER...]

OPTIONS说明:

-s :向容器发送一个信号

实例

杀掉运行中的容器mynginx

runoob@runoob:~$ docker kill -s KILL mynginx
mynginx

rm

1
2
3
4
5
6
7
8
9
10
11
12
13
14
15
16
17
18
19
20
21
22
23
24
25
26
docker rm :删除一个或多少容器
语法

docker rm [OPTIONS] CONTAINER [CONTAINER...]

OPTIONS说明:

-f :通过SIGKILL信号强制删除一个运行中的容器

-l :移除容器间的网络连接,而非容器本身

-v :-v 删除与容器关联的卷

实例

强制删除容器db01、db02

docker rm -f db01 db02

移除容器nginx01对容器db01的连接,连接名db

docker rm -l db

删除容器nginx01,并删除容器挂载的数据卷

docker rm -v nginx01

pause/unpause

1
2
3
4
5
6
7
8
9
10
11
12
13
14
15
16
17
18
docker pause :暂停容器中所有的进程。

docker unpause :恢复容器中所有的进程。
语法

docker pause [OPTIONS] CONTAINER [CONTAINER...]

docker unpause [OPTIONS] CONTAINER [CONTAINER...]

实例

暂停数据库容器db01提供服务。

docker pause db01

恢复数据库容器db01提供服务。

docker unpause db01

create

1
2
3
4
5
6
7
8
9
10
11
12
13
14
docker create :创建一个新的容器但不启动它

用法同 docker run
语法

docker create [OPTIONS] IMAGE [COMMAND] [ARG...]

语法同 docker run
实例

使用docker镜像nginx:latest创建一个容器,并将容器命名为myrunoob

runoob@runoob:~$ docker create --name myrunoob nginx:latest
09b93464c2f75b7b69f83d56a9cfc23ceb50a48a9db7652ee4c27e3e2cb1961f

exec

1
2
3
4
5
6
7
8
9
10
11
12
13
14
15
16
17
18
19
20
21
22
23
24
25
26
27
28
29
30
31
32
33
34
35
36
37
38
39
docker exec :在运行的容器中执行命令
语法

docker exec [OPTIONS] CONTAINER COMMAND [ARG...]

OPTIONS说明:

-d :分离模式: 在后台运行

-i :即使没有附加也保持STDIN 打开

-t :分配一个伪终端

实例

在容器 mynginx 中以交互模式执行容器内 /root/runoob.sh 脚本:

runoob@runoob:~$ docker exec -it mynginx /bin/sh /root/runoob.sh
http://www.runoob.com/

在容器 mynginx 中开启一个交互模式的终端:

runoob@runoob:~$ docker exec -i -t mynginx /bin/bash
root@b1a0703e41e7:/#

也可以通过 docker ps -a 命令查看已经在运行的容器,然后使用容器 ID 进入容器。

查看已经在运行的容器 ID:

# docker ps -a
...
9df70f9a0714 openjdk "/usercode/script.sh…"
...

第一列的 9df70f9a0714 就是容器 ID。

通过 exec 命令对指定的容器执行 bash:

# docker exec -it 9df70f9a0714 /bin/bash

容器操作

ps

1
2
3
4
5
6
7
8
9
10
11
12
13
14
15
16
17
18
19
20
21
22
23
24
25
26
27
28
29
30
31
32
33
34
35
36
37
38
39
40
41
42
43
44
45
46
47
48
49
50
51
52
53
54
55
56
57
58
59
60
61
62
63
64
65
66
67
68
69
70
71
72
73
74
75
76
77
78
79
80
81
82
83
84
85
86
87
docker ps : 列出容器
语法

docker ps [OPTIONS]

OPTIONS说明:

-a :显示所有的容器,包括未运行的。

-f :根据条件过滤显示的内容。

--format :指定返回值的模板文件。

-l :显示最近创建的容器。

-n :列出最近创建的n个容器。

--no-trunc :不截断输出。

-q :静默模式,只显示容器编号。

-s :显示总的文件大小。

实例

列出所有在运行的容器信息。

runoob@runoob:~$ docker ps
CONTAINER ID IMAGE COMMAND ... PORTS NAMES
09b93464c2f7 nginx:latest "nginx -g 'daemon off" ... 80/tcp, 443/tcp myrunoob
96f7f14e99ab mysql:5.6 "docker-entrypoint.sh" ... 0.0.0.0:3306->3306/tcp mymysql

列出最近创建的5个容器信息。

runoob@runoob:~$ docker ps -n 5
CONTAINER ID IMAGE COMMAND CREATED
09b93464c2f7 nginx:latest "nginx -g 'daemon off" 2 days ago ...
b8573233d675 nginx:latest "/bin/bash" 2 days ago ...
b1a0703e41e7 nginx:latest "nginx -g 'daemon off" 2 days ago ...
f46fb1dec520 5c6e1090e771 "/bin/sh -c 'set -x \t" 2 days ago ...
a63b4a5597de 860c279d2fec "bash" 2 days ago ...

列出所有创建的容器ID。

runoob@runoob:~$ docker ps -a -q
09b93464c2f7
b8573233d675
b1a0703e41e7
f46fb1dec520
a63b4a5597de
6a4aa42e947b
de7bb36e7968
43a432b73776
664a8ab1a585
ba52eb632bbd
...

根据条件过滤显示的内容

根据标签过滤

$ docker run -d --name=test-nginx --label color=blue nginx
$ docker ps --filter "label=color"
$ docker ps --filter "label=color=blue"

根据名称过滤

$ docker ps --filter"name=test-nginx"

根据状态过滤

$ docker ps -a --filter 'exited=0'
$ docker ps --filter status=running
$ docker ps --filter status=paused

根据镜像过滤

#镜像名称
$ docker ps --filter ancestor=nginx

#镜像ID
$ docker ps --filter ancestor=d0e008c6cf02

根据启动顺序过滤

$ docker ps -f before=9c3527ed70ce
$ docker ps -f since=6e63f6ff38b0

inspect

1
2
3
4
5
6
7
8
9
10
11
12
13
14
15
16
17
18
19
20
21
22
23
24
25
26
27
28
29
30
31
32
33
34
35
36
37
38
39
40
41
42
43
44
45
docker inspect : 获取容器/镜像的元数据。
语法

docker inspect [OPTIONS] NAME|ID [NAME|ID...]

OPTIONS说明:

-f :指定返回值的模板文件。

-s :显示总的文件大小。

--type :为指定类型返回JSON。

实例

获取镜像mysql:5.6的元信息。

runoob@runoob:~$ docker inspect mysql:5.6
[
{
"Id": "sha256:2c0964ec182ae9a045f866bbc2553087f6e42bfc16074a74fb820af235f070ec",
"RepoTags": [
"mysql:5.6"
],
"RepoDigests": [],
"Parent": "",
"Comment": "",
"Created": "2016-05-24T04:01:41.168371815Z",
"Container": "e0924bc460ff97787f34610115e9363e6363b30b8efa406e28eb495ab199ca54",
"ContainerConfig": {
"Hostname": "b0cf605c7757",
"Domainname": "",
"User": "",
"AttachStdin": false,
"AttachStdout": false,
"AttachStderr": false,
"ExposedPorts": {
"3306/tcp": {}
},
...

获取正在运行的容器mymysql的 IP。

runoob@runoob:~$ docker inspect --format='{{range .NetworkSettings.Networks}}{{.IPAddress}}{{end}}' mymysql
172.17.0.3

top

1
2
3
4
5
6
7
8
9
10
11
12
13
14
15
16
17
docker top :查看容器中运行的进程信息,支持 ps 命令参数。
语法

docker top [OPTIONS] CONTAINER [ps OPTIONS]

容器运行时不一定有/bin/bash终端来交互执行top命令,而且容器还不一定有top命令,可以使用docker top来实现查看container中正在运行的进程。
实例

查看容器mymysql的进程信息。

runoob@runoob:~/mysql$ docker top mymysql
UID PID PPID C STIME TTY TIME CMD
999 40347 40331 18 00:58 ? 00:00:02 mysqld

查看所有运行容器的进程信息。

for i in `docker ps |grep Up|awk '{print $1}'`;do echo \ &&docker top $i; done

attach

1
2
3
4
5
6
7
8
9
10
11
12
13
14
docker attach :连接到正在运行中的容器。
语法

docker attach [OPTIONS] CONTAINER

要attach上去的容器必须正在运行,可以同时连接上同一个container来共享屏幕(与screen命令的attach类似)。

官方文档中说attach后可以通过CTRL-C来detach,但实际上经过我的测试,如果container当前在运行bash,CTRL-C自然是当前行的输入,没有退出;如果container当前正在前台运行进程,如输出nginx的access.log日志,CTRL-C不仅会导致退出容器,而且还stop了。这不是我们想要的,detach的意思按理应该是脱离容器终端,但容器依然运行。好在attach是可以带上--sig-proxy=false来确保CTRL-D或CTRL-C不会关闭容器。
实例

容器mynginx将访问日志指到标准输出,连接到容器查看访问信息。

runoob@runoob:~$ docker attach --sig-proxy=false mynginx
192.168.239.1 - - [10/Jul/2016:16:54:26 +0000] "GET / HTTP/1.1" 304 0 "-" "Mozilla/5.0 (Windows NT 6.1; WOW64) AppleWebKit/537.36 (KHTML, like Gecko) Chrome/45.0.2454.93 Safari/537.36" "-"

events

1
2
3
4
5
6
7
8
9
10
11
12
13
14
15
16
17
18
19
20
21
22
23
24
25
26
27
28
29
30
31
32
33
34
35
36
37
38
39
40
41
42
docker events : 从服务器获取实时事件
语法

docker events [OPTIONS]

OPTIONS说明:

-f :根据条件过滤事件;

--since :从指定的时间戳后显示所有事件;

--until :流水时间显示到指定的时间为止;

实例

显示docker 2016年7月1日后的所有事件。

runoob@runoob:~/mysql$ docker events --since="1467302400"
2016-07-08T19:44:54.501277677+08:00 network connect 66f958fd13dc4314ad20034e576d5c5eba72e0849dcc38ad9e8436314a4149d4 (container=b8573233d675705df8c89796a2c2687cd8e36e03646457a15fb51022db440e64, name=bridge, type=bridge)
2016-07-08T19:44:54.723876221+08:00 container start b8573233d675705df8c89796a2c2687cd8e36e03646457a15fb51022db440e64 (image=nginx:latest, name=elegant_albattani)
2016-07-08T19:44:54.726110498+08:00 container resize b8573233d675705df8c89796a2c2687cd8e36e03646457a15fb51022db440e64 (height=39, image=nginx:latest, name=elegant_albattani, width=167)
2016-07-08T19:46:22.137250899+08:00 container die b8573233d675705df8c89796a2c2687cd8e36e03646457a15fb51022db440e64 (exitCode=0, image=nginx:latest, name=elegant_albattani)
...

显示docker 镜像为mysql:5.6 2016年7月1日后的相关事件。

runoob@runoob:~/mysql$ docker events -f "image"="mysql:5.6" --since="1467302400"
2016-07-11T00:38:53.975174837+08:00 container start 96f7f14e99ab9d2f60943a50be23035eda1623782cc5f930411bbea407a2bb10 (image=mysql:5.6, name=mymysql)
2016-07-11T00:51:17.022572452+08:00 container kill 96f7f14e99ab9d2f60943a50be23035eda1623782cc5f930411bbea407a2bb10 (image=mysql:5.6, name=mymysql, signal=9)
2016-07-11T00:51:17.132532080+08:00 container die 96f7f14e99ab9d2f60943a50be23035eda1623782cc5f930411bbea407a2bb10 (exitCode=137, image=mysql:5.6, name=mymysql)
2016-07-11T00:51:17.514661357+08:00 container destroy 96f7f14e99ab9d2f60943a50be23035eda1623782cc5f930411bbea407a2bb10 (image=mysql:5.6, name=mymysql)
2016-07-11T00:57:18.551984549+08:00 container create c8f0a32f12f5ec061d286af0b1285601a3e33a90a08ff1706de619ac823c345c (image=mysql:5.6, name=mymysql)
2016-07-11T00:57:18.557405864+08:00 container attach c8f0a32f12f5ec061d286af0b1285601a3e33a90a08ff1706de619ac823c345c (image=mysql:5.6, name=mymysql)
2016-07-11T00:57:18.844134112+08:00 container start c8f0a32f12f5ec061d286af0b1285601a3e33a90a08ff1706de619ac823c345c (image=mysql:5.6, name=mymysql)
2016-07-11T00:57:19.140141428+08:00 container die c8f0a32f12f5ec061d286af0b1285601a3e33a90a08ff1706de619ac823c345c (exitCode=1, image=mysql:5.6, name=mymysql)
2016-07-11T00:58:05.941019136+08:00 container destroy c8f0a32f12f5ec061d286af0b1285601a3e33a90a08ff1706de619ac823c345c (image=mysql:5.6, name=mymysql)
2016-07-11T00:58:07.965128417+08:00 container create a404c6c174a21c52f199cfce476e041074ab020453c7df2a13a7869b48f2f37e (image=mysql:5.6, name=mymysql)
2016-07-11T00:58:08.188734598+08:00 container start a404c6c174a21c52f199cfce476e041074ab020453c7df2a13a7869b48f2f37e (image=mysql:5.6, name=mymysql)
2016-07-11T00:58:20.010876777+08:00 container top a404c6c174a21c52f199cfce476e041074ab020453c7df2a13a7869b48f2f37e (image=mysql:5.6, name=mymysql)
2016-07-11T01:06:01.395365098+08:00 container top a404c6c174a21c52f199cfce476e041074ab020453c7df2a13a7869b48f2f37e (image=mysql:5.6, name=mymysql)

如果指定的时间是到秒级的,需要将时间转成时间戳。如果时间为日期的话,可以直接使用,如--since="2016-07-01"。

logs

1
2
3
4
5
6
7
8
9
10
11
12
13
14
15
16
17
18
19
20
21
22
23
24
25
26
27
28
29
docker logs : 获取容器的日志
语法

docker logs [OPTIONS] CONTAINER

OPTIONS说明:

-f : 跟踪日志输出

--since :显示某个开始时间的所有日志

-t : 显示时间戳

--tail :仅列出最新N条容器日志

实例

跟踪查看容器mynginx的日志输出。

runoob@runoob:~$ docker logs -f mynginx
192.168.239.1 - - [10/Jul/2016:16:53:33 +0000] "GET / HTTP/1.1" 200 612 "-" "Mozilla/5.0 (Windows NT 6.1; WOW64) AppleWebKit/537.36 (KHTML, like Gecko) Chrome/45.0.2454.93 Safari/537.36" "-"
2016/07/10 16:53:33 [error] 5#5: *1 open() "/usr/share/nginx/html/favicon.ico" failed (2: No such file or directory), client: 192.168.239.1, server: localhost, request: "GET /favicon.ico HTTP/1.1", host: "192.168.239.130", referrer: "http://192.168.239.130/"
192.168.239.1 - - [10/Jul/2016:16:53:33 +0000] "GET /favicon.ico HTTP/1.1" 404 571 "http://192.168.239.130/" "Mozilla/5.0 (Windows NT 6.1; WOW64) AppleWebKit/537.36 (KHTML, like Gecko) Chrome/45.0.2454.93 Safari/537.36" "-"
192.168.239.1 - - [10/Jul/2016:16:53:59 +0000] "GET / HTTP/1.1" 304 0 "-" "Mozilla/5.0 (Windows NT 6.1; WOW64) AppleWebKit/537.36 (KHTML, like Gecko) Chrome/45.0.2454.93 Safari/537.36" "-"
...

查看容器mynginx从2016年7月1日后的最新10条日志。

docker logs --since="2016-07-01" --tail=10 mynginx

wait

1
2
3
4
5
6
7
8
docker wait : 阻塞运行直到容器停止,然后打印出它的退出代码。
语法

docker wait [OPTIONS] CONTAINER [CONTAINER...]

实例

docker wait CONTAINER

export

1
2
3
4
5
6
7
8
9
10
11
12
13
14
15
16
docker export :将文件系统作为一个tar归档文件导出到STDOUT。
语法

docker export [OPTIONS] CONTAINER

OPTIONS说明:

-o :将输入内容写到文件。

实例

将id为a404c6c174a2的容器按日期保存为tar文件。

runoob@runoob:~$ docker export -o mysql-`date +%Y%m%d`.tar a404c6c174a2
runoob@runoob:~$ ls mysql-`date +%Y%m%d`.tar
mysql-20160711.tar

port

1
2
3
4
5
6
7
8
9
10
11
docker port :列出指定的容器的端口映射,或者查找将PRIVATE_PORT NAT到面向公众的端口。
语法

docker port [OPTIONS] CONTAINER [PRIVATE_PORT[/PROTO]]

实例

查看容器mynginx的端口映射情况。

runoob@runoob:~$ docker port mymysql
3306/tcp -> 0.0.0.0:3306

容器rootfs命令

commit

1
2
3
4
5
6
7
8
9
10
11
12
13
14
15
16
17
18
19
20
21
22
23
24
docker commit :从容器创建一个新的镜像。
语法

docker commit [OPTIONS] CONTAINER [REPOSITORY[:TAG]]

OPTIONS说明:

-a :提交的镜像作者;

-c :使用Dockerfile指令来创建镜像;

-m :提交时的说明文字;

-p :在commit时,将容器暂停。

实例

将容器a404c6c174a2 保存为新的镜像,并添加提交人信息和说明信息。

runoob@runoob:~$ docker commit -a "runoob.com" -m "my apache" a404c6c174a2 mymysql:v1
sha256:37af1236adef1544e8886be23010b66577647a40bc02c0885a6600b33ee28057
runoob@runoob:~$ docker images mymysql:v1
REPOSITORY TAG IMAGE ID CREATED SIZE
mymysql v1 37af1236adef 15 seconds ago 329 MB

cp

1
2
3
4
5
6
7
8
9
10
11
12
13
14
15
16
17
18
19
20
21
22
23
24
docker cp :用于容器与主机之间的数据拷贝。
语法

docker cp [OPTIONS] CONTAINER:SRC_PATH DEST_PATH|-

docker cp [OPTIONS] SRC_PATH|- CONTAINER:DEST_PATH

OPTIONS说明:

-L :保持源目标中的链接

实例

将主机/www/runoob目录拷贝到容器96f7f14e99ab的/www目录下。

docker cp /www/runoob 96f7f14e99ab:/www/

将主机/www/runoob目录拷贝到容器96f7f14e99ab中,目录重命名为www。

docker cp /www/runoob 96f7f14e99ab:/www

将容器96f7f14e99ab的/www目录拷贝到主机的/tmp目录中。

docker cp 96f7f14e99ab:/www /tmp/

diff

1
2
3
4
5
6
7
8
9
10
11
12
13
14
15
16
17
docker diff : 检查容器里文件结构的更改。
语法

docker diff [OPTIONS] CONTAINER

实例

查看容器mymysql的文件结构更改。

runoob@runoob:~$ docker diff mymysql
A /logs
A /mysql_data
C /run
C /run/mysqld
A /run/mysqld/mysqld.pid
A /run/mysqld/mysqld.sock
C /tmp

镜像仓库

login

1
2
3
4
5
6
7
8
9
10
11
12
13
14
15
16
17
18
19
20
21
22
23
24
docker login : 登陆到一个Docker镜像仓库,如果未指定镜像仓库地址,默认为官方仓库 Docker Hub

docker logout : 登出一个Docker镜像仓库,如果未指定镜像仓库地址,默认为官方仓库 Docker Hub
语法

docker login [OPTIONS] [SERVER]

docker logout [OPTIONS] [SERVER]

OPTIONS说明:

-u :登陆的用户名

-p :登陆的密码

实例

登陆到Docker Hub

docker login -u 用户名 -p 密码

登出Docker Hub

docker logout

pull

1
2
3
4
5
6
7
8
9
10
11
12
13
14
15
16
17
18
19
20
docker pull : 从镜像仓库中拉取或者更新指定镜像
语法

docker pull [OPTIONS] NAME[:TAG|@DIGEST]

OPTIONS说明:

-a :拉取所有 tagged 镜像

--disable-content-trust :忽略镜像的校验,默认开启

实例

从Docker Hub下载java最新版镜像。

docker pull java

从Docker Hub下载REPOSITORY为java的所有镜像。

docker pull -a java

push

1
2
3
4
5
6
7
8
9
10
11
12
13
14
docker push : 将本地的镜像上传到镜像仓库,要先登陆到镜像仓库
语法

docker push [OPTIONS] NAME[:TAG]

OPTIONS说明:

--disable-content-trust :忽略镜像的校验,默认开启

实例

上传本地镜像myapache:v1到镜像仓库中。

docker push myapache:v1
1
2
3
4
5
6
7
8
9
10
11
12
13
14
15
16
17
18
19
20
21
22
23
24
25
docker search : 从Docker Hub查找镜像
语法

docker search [OPTIONS] TERM

OPTIONS说明:

--automated :只列出 automated build类型的镜像;

--no-trunc :显示完整的镜像描述;

-s :列出收藏数不小于指定值的镜像。

实例

从Docker Hub查找所有镜像名包含java,并且收藏数大于10的镜像

runoob@runoob:~$ docker search -s 10 java
NAME DESCRIPTION STARS OFFICIAL AUTOMATED
java Java is a concurrent, class-based... 1037 [OK]
anapsix/alpine-java Oracle Java 8 (and 7) with GLIBC ... 115 [OK]
develar/java 46 [OK]
isuper/java-oracle This repository contains all java... 38 [OK]
lwieske/java-8 Oracle Java 8 Container - Full + ... 27 [OK]
nimmis/java-centos This is docker images of CentOS 7... 13 [OK]

本地镜像管理

images

1
2
3
4
5
6
7
8
9
10
11
12
13
14
15
16
17
18
19
20
21
22
23
24
25
26
27
28
29
30
31
32
33
34
35
36
37
38
39
40
41
42
docker images : 列出本地镜像。
语法

docker images [OPTIONS] [REPOSITORY[:TAG]]

OPTIONS说明:

-a :列出本地所有的镜像(含中间映像层,默认情况下,过滤掉中间映像层);

--digests :显示镜像的摘要信息;

-f :显示满足条件的镜像;

--format :指定返回值的模板文件;

--no-trunc :显示完整的镜像信息;

-q :只显示镜像ID。

实例

查看本地镜像列表。

runoob@runoob:~$ docker images
REPOSITORY TAG IMAGE ID CREATED SIZE
mymysql v1 37af1236adef 5 minutes ago 329 MB
runoob/ubuntu v4 1c06aa18edee 2 days ago 142.1 MB
<none> <none> 5c6e1090e771 2 days ago 165.9 MB
httpd latest ed38aaffef30 11 days ago 195.1 MB
alpine latest 4e38e38c8ce0 2 weeks ago 4.799 MB
mongo 3.2 282fd552add6 3 weeks ago 336.1 MB
redis latest 4465e4bcad80 3 weeks ago 185.7 MB
php 5.6-fpm 025041cd3aa5 3 weeks ago 456.3 MB
python 3.5 045767ddf24a 3 weeks ago 684.1 MB
...

列出本地镜像中REPOSITORY为ubuntu的镜像列表。

root@runoob:~# docker images ubuntu
REPOSITORY TAG IMAGE ID CREATED SIZE
ubuntu 14.04 90d5884b1ee0 9 weeks ago 188 MB
ubuntu 15.10 4e3b13c8a266 3 months ago 136.3 MB

rmi

1
2
3
4
5
6
7
8
9
10
11
12
13
14
15
16
17
18
19
20
21
22
23
24
25
26
27
28
29
30
31
32
33
34
35
36
37
38
39
40
41
42
43
44
45
46
docker rmi : 删除本地一个或多少镜像。
语法

docker rmi [OPTIONS] IMAGE [IMAGE...]

OPTIONS说明:

-f :强制删除;

--no-prune :不移除该镜像的过程镜像,默认移除;

实例

强制删除本地镜像 runoob/ubuntu:v4。

root@runoob:~# docker rmi -f runoob/ubuntu:v4
Untagged: runoob/ubuntu:v4
Deleted: sha256:1c06aa18edee44230f93a90a7d88139235de12cd4c089d41eed8419b503072be
Deleted: sha256:85feb446e89a28d58ee7d80ea5ce367eebb7cec70f0ec18aa4faa874cbd97c73

prune 命令用来删除不再使用的 docker 对象。
删除所有未被 tag 标记和未被容器使用的镜像:

$ docker image prune
WARNING! This will remove all dangling images.
Are you sure you want to continue? [y/N] y

删除所有未被容器使用的镜像:

$ docker image prune -a

删除所有停止运行的容器:

$ docker container prune

删除所有未被挂载的卷:

$ docker volume prune

删除所有网络:

$ docker network prune

删除 docker 所有资源:

$ docker system prune

tag

1
2
3
4
5
6
7
8
9
10
11
12
13
docker tag : 标记本地镜像,将其归入某一仓库。
语法

docker tag [OPTIONS] IMAGE[:TAG] [REGISTRYHOST/][USERNAME/]NAME[:TAG]

实例

将镜像ubuntu:15.10标记为 runoob/ubuntu:v3 镜像。

root@runoob:~# docker tag ubuntu:15.10 runoob/ubuntu:v3
root@runoob:~# docker images runoob/ubuntu:v3
REPOSITORY TAG IMAGE ID CREATED SIZE
runoob/ubuntu v3 4e3b13c8a266 3 months ago 136.3 MB

build

1
2
3
4
5
6
7
8
9
10
11
12
13
14
15
16
17
18
19
20
21
22
23
24
25
26
27
28
29
30
31
32
33
34
35
36
37
38
39
40
41
42
43
44
45
46
47
48
49
50
51
52
53
54
55
56
57
58
59
60
61
62
63
64
65
66
67
68
docker build 命令用于使用 Dockerfile 创建镜像。
语法

docker build [OPTIONS] PATH | URL | -

OPTIONS说明:

--build-arg=[] :设置镜像创建时的变量;

--cpu-shares :设置 cpu 使用权重;

--cpu-period :限制 CPU CFS周期;

--cpu-quota :限制 CPU CFS配额;

--cpuset-cpus :指定使用的CPU id;

--cpuset-mems :指定使用的内存 id;

--disable-content-trust :忽略校验,默认开启;

-f :指定要使用的Dockerfile路径;

--force-rm :设置镜像过程中删除中间容器;

--isolation :使用容器隔离技术;

--label=[] :设置镜像使用的元数据;

-m :设置内存最大值;

--memory-swap :设置Swap的最大值为内存+swap,"-1"表示不限swap;

--no-cache :创建镜像的过程不使用缓存;

--pull :尝试去更新镜像的新版本;

--quiet, -q :安静模式,成功后只输出镜像 ID;

--rm :设置镜像成功后删除中间容器;

--shm-size :设置/dev/shm的大小,默认值是64M;

--ulimit :Ulimit配置。

--tag, -t: 镜像的名字及标签,通常 name:tag 或者 name 格式;可以在一次构建中为一个镜像设置多个标签。

--network: 默认 default。在构建期间设置RUN指令的网络模式

实例

使用当前目录的 Dockerfile 创建镜像,标签为 runoob/ubuntu:v1。

docker build -t runoob/ubuntu:v1 .

使用URL github.com/creack/docker-firefox 的 Dockerfile 创建镜像。

docker build github.com/creack/docker-firefox

也可以通过 -f Dockerfile 文件的位置:

$ docker build -f /path/to/a/Dockerfile .

在 Docker 守护进程执行 Dockerfile 中的指令前,首先会对 Dockerfile 进行语法检查,有语法错误时会返回:

$ docker build -t test/myapp .
Sending build context to Docker daemon 2.048 kB
Error response from daemon: Unknown instruction: RUNCMD

history

1
2
3
4
5
6
7
8
9
10
11
12
13
14
15
16
17
18
19
20
21
22
23
docker history : 查看指定镜像的创建历史。
语法

docker history [OPTIONS] IMAGE

OPTIONS说明:

-H :以可读的格式打印镜像大小和日期,默认为true;

--no-trunc :显示完整的提交记录;

-q :仅列出提交记录ID。

实例

查看本地镜像runoob/ubuntu:v3的创建历史。

root@runoob:~# docker history runoob/ubuntu:v3
IMAGE CREATED CREATED BY SIZE COMMENT
4e3b13c8a266 3 months ago /bin/sh -c #(nop) CMD ["/bin/bash"] 0 B
<missing> 3 months ago /bin/sh -c sed -i 's/^#\s*\(deb.*universe\)$/ 1.863 kB
<missing> 3 months ago /bin/sh -c set -xe && echo '#!/bin/sh' > /u 701 B
<missing> 3 months ago /bin/sh -c #(nop) ADD file:43cb048516c6b80f22 136.3 MB

save

1
2
3
4
5
6
7
8
9
10
11
12
13
14
15
16
17
18
19
20
21
22
23
24
25
26
27
28
29
30
31
32
33
34
docker save : 将指定镜像保存成 tar 归档文件。
语法

docker save [OPTIONS] IMAGE [IMAGE...]

OPTIONS 说明:

-o :输出到的文件。

实例

将镜像 runoob/ubuntu:v3 生成 my_ubuntu_v3.tar 文档

runoob@runoob:~$ docker save -o my_ubuntu_v3.tar runoob/ubuntu:v3
runoob@runoob:~$ ll my_ubuntu_v3.tar
-rw------- 1 runoob runoob 142102016 Jul 11 01:37 my_ubuntu_v3.ta

docker 容器导入导出有两种方法:

一种是使用 save 和 load 命令

使用例子如下:

docker save ubuntu:load>/root/ubuntu.tar
docker load<ubuntu.tar

一种是使用 export 和 import 命令

使用例子如下:

docker export 98ca36> ubuntu.tar
cat ubuntu.tar | sudo docker import - ubuntu:import

需要注意两种方法不可混用。

load

1
2
3
4
5
6
7
8
9
10
11
12
13
14
15
16
17
docker load : 导入使用 docker save 命令导出的镜像。
语法

docker load [OPTIONS]

OPTIONS 说明:

-i :指定导出的文件。

-q :精简输出信息。

实例

导入镜像:

docker load -i ubuntu.tar
docker load < ubuntu.tar

import

1
2
3
4
5
6
7
8
9
10
11
12
13
14
15
16
17
18
19
20
docker import : 从归档文件中创建镜像。
语法

docker import [OPTIONS] file|URL|- [REPOSITORY[:TAG]]

OPTIONS说明:

-c :应用docker 指令创建镜像;

-m :提交时的说明文字;

实例

从镜像归档文件my_ubuntu_v3.tar创建镜像,命名为runoob/ubuntu:v4

runoob@runoob:~$ docker import my_ubuntu_v3.tar runoob/ubuntu:v4
sha256:63ce4a6d6bc3fabb95dbd6c561404a309b7bdfc4e21c1d59fe9fe4299cbfea39
runoob@runoob:~$ docker images runoob/ubuntu:v4
REPOSITORY TAG IMAGE ID CREATED SIZE
runoob/ubuntu v4 63ce4a6d6bc3 20 seconds ago 142.1 MB

info|version

info

1
2
3
4
5
6
7
8
9
10
11
12
13
14
15
16
17
18
19
20
21
22
23
24
25
docker info : 显示 Docker 系统信息,包括镜像和容器数。。
语法

docker info [OPTIONS]

实例

查看docker系统信息。

$ docker info
Containers: 12
Images: 41
Storage Driver: aufs
Root Dir: /var/lib/docker/aufs
Backing Filesystem: extfs
Dirs: 66
Dirperm1 Supported: false
Execution Driver: native-0.2
Logging Driver: json-file
Kernel Version: 3.13.0-32-generic
Operating System: Ubuntu 14.04.1 LTS
CPUs: 1
Total Memory: 1.954 GiB
Name: iZ23mtq8bs1Z
ID: M5N4:K6WN:PUNC:73ZN:AONJ:AUHL:KSYH:2JPI:CH3K:O4MK:6OCX:5OYW

version

1
2
3
4
5
6
7
8
9
10
11
12
13
14
15
16
17
18
19
20
21
22
23
24
25
26
27
28
29
docker version :显示 Docker 版本信息。
语法

docker version [OPTIONS]

OPTIONS说明:

-f :指定返回值的模板文件。

实例

显示 Docker 版本信息。

$ docker version
Client:
Version: 1.8.2
API version: 1.20
Go version: go1.4.2
Git commit: 0a8c2e3
Built: Thu Sep 10 19:19:00 UTC 2015
OS/Arch: linux/amd64

Server:
Version: 1.8.2
API version: 1.20
Go version: go1.4.2
Git commit: 0a8c2e3
Built: Thu Sep 10 19:19:00 UTC 2015
OS/Arch: linux/amd64

Docker 资源汇总

Docker官方英文资源

docker官网:http://www.docker.com

Docker Windows 入门:https://docs.docker.com/docker-for-windows/

Docker CE(社区版) Ubuntu:https://docs.docker.com/install/linux/docker-ce/ubuntu/

Docker mac 入门:https://docs.docker.com/docker-for-mac/

Docker 用户指引:https://docs.docker.com/config/daemon/

Docker 官方博客:http://blog.docker.com/

Docker Hub: https://hub.docker.com/

Docker开源: https://www.docker.com/open-source

Docker中文资源

Docker中文网站:https://www.docker-cn.com/

Docker安装手册:https://docs.docker-cn.com/engine/installation/

Docker 国内镜像

阿里云的加速器:https://help.aliyun.com/document_detail/60750.html

网易加速器:http://hub-mirror.c.163.com

官方中国加速器:https://registry.docker-cn.com

ustc的镜像:https://docker.mirrors.ustc.edu.cn

daocloud:https://www.daocloud.io/mirror#accelerator-doc(注册后使用)

-------------本文结束 感谢您的阅读-------------
如果觉得我的文章对您有用,请随意打赏.您的支持将鼓励我继续创作!

  • 本文标题: Docker教程
  • 文章作者: 永夜初晗凝碧天
  • 发布时间: 2019年07月15日 - 16:07:00
  • 更新时间: 2019年12月31日 - 12:12:25
  • 本文链接: https://yongnights.github.io/2019/07/15/Docker教程/
  • 版权声明: 署名-非商业性使用-禁止演绎 4.0 国际 转载请保留原文链接及作者。